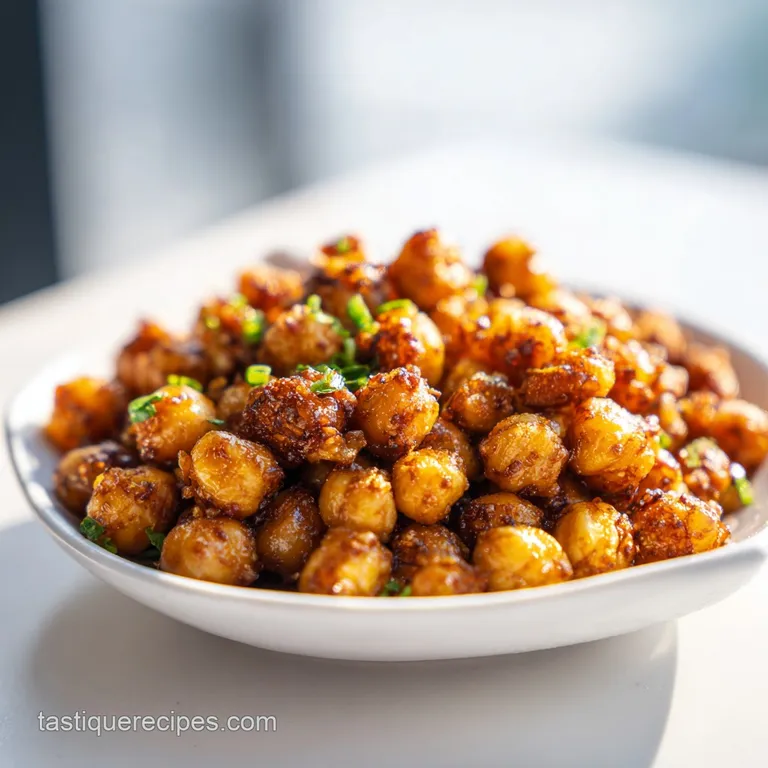
Vegan General Tso Chickpeas Recipe
- Time: Active 15 minutes, Passive 20 minutes, Total 35 minutes
- Flavor/Texture Hook: Sweet savory umami glaze with a crispy, golden exterior
- Perfect for: Busy weeknight dinners or a healthier takeout alternative
- Creating the Ultimate Vegan General Tso Chickpeas
- The Science of Shatteringly Crisp Coating
- Essential Kitchen Specs and Times
- Sourcing Your Authentic Flavor Elements
- Must Have Tools for over High heat Cooking
- Master the Multi Phase Cooking Process
- Fixing Sauce and Texture Troubles
- Flavor Variations and Ingredient Swaps
- Smart Storage and Zero Waste Tips
- How to Serve Your Final Masterpiece
- High in Sodium
- Recipe FAQs
- 📝 Recipe Card
Creating the Ultimate Vegan General Tso Chickpeas
The sharp sizzle when the chickpeas hit the hot oil is the first sign that dinner is going to be a success. There is something incredibly satisfying about hearing that sound, knowing that in just a few minutes, you will be biting into something with a serious crunch.
I used to think that achieving restaurant quality texture at home required a commercial deep fryer and a gallon of oil, but I was wrong. My early attempts were, frankly, a bit of a soggy mess because I didn't understand how moisture behaves in a pan.
I remember one Tuesday night when I was craving that classic spicy sweet glaze but didn't want the heavy feeling of traditional takeout. I tossed some canned chickpeas into a pan with a splash of soy sauce, hoping for the best. They were edible, sure, but they lacked that essential "shatter" when you bite into them.
After a lot of trial and error in my own kitchen, I figured out the secret. It is all about the "dry prep" phase and the way cornstarch interacts with heat and fat.
Now, this vegan general tso chickpeas recipe is a staple in my house. It bridges that gap between a quick pantry meal and a dish that feels like it came from a professional kitchen.
We are going to focus on building layers of flavor starting with the aromatics and ending with a glossy, velvety sauce that clings to every single chickpea. You won't miss the meat, and you certainly won't miss the delivery fees. Let's get into the mechanics of how to make this work every single time.
The Science of Shatteringly Crisp Coating
Starch Retrogradation: When cornstarch hits the hot oil, it undergoes a process where the starch granules swell and then dehydrate, creating a rigid, porous structure that stays crispy even when coated in sauce.
This "starch shield" acts as a barrier, preventing the interior of the chickpea from becoming tough while providing that signature crunch.
Cook Method Comparison: Stovetop vs. Oven
| Method | Time | Texture | Best For |
|---|---|---|---|
| Stovetop (Skillet) | 12 minutes | Shatteringly crisp edges, slightly softer centers | Maximum "fried" feel with less oil |
| Oven (Roasting) | 25 minutes | Uniformly crunchy, almost like a snack nut | Hands off cooking and larger batches |
Choosing the right method depends on your mood. If you want that authentic stir fry energy, stick to the skillet. The high, direct heat creates a more varied texture that mimics traditional General Tso's perfectly.
If you are prepping for a crowd and don't want to stand over the stove, the oven is your best friend, though you might lose a tiny bit of that "velvety" sauce cling.
Essential Kitchen Specs and Times
To get this dish right, we need to respect the timing of each phase. This isn't a "dump and stir" situation; it’s a rhythmic process of searing and glazing. If you rush the searing phase, you'll end up with a floury taste. If you overcook the sauce, the sugars in the maple syrup will burn and turn bitter.
Chef Tip: Freeze your ginger for 10 minutes before grating. It makes the fibers much easier to slice through, resulting in a fine paste that melts into the sauce rather than leaving woody chunks in your teeth.
Before you start, make sure your chickpeas are bone dry. I usually roll mine between two clean kitchen towels. If there is even a hint of moisture on the surface, the cornstarch will turn into a gummy paste instead of a crisp shell. It's a small step that makes a massive difference in the final result.
| Metric | Target Value | Visual/Sensory Cue |
|---|---|---|
| Chickpea Dryness | 100% Matte | No shine or visible water on the skins |
| Oil Temperature | 180°C | A single chickpea should sizzle immediately |
| Sauce Thickness | Nappe Consistency | Sauce should coat the back of a spoon cleanly |
Sourcing Your Authentic Flavor Elements
We are using a mix of pantry staples and fresh aromatics to build our flavor profile. The combination of low sodium soy sauce and tomato paste might seem unusual for a traditional sauce, but the tomato paste provides a rich, savory body and a hint of acidity that mimics the complexity of long simmered sauces.
- 30 oz canned chickpeas: Drained and rinsed. Why this? Canned chickpeas are pre softened, ensuring the interior remains creamy after searing.
- 3 tbsp cornstarch (for coating): For that essential crunch.
- 0.5 tsp sea salt: To season the base layer.
- 2 tbsp avocado oil: A high smoke point oil is crucial here.
- 0.25 cup low sodium soy sauce: The primary salt and umami source.
- 2 tbsp rice vinegar: Provides the "tang" in the sweet and sour.
- 2 tbsp maple syrup: A natural sweetener that caramelizes beautifully.
- 1 tbsp tomato paste: For depth and color.
- 1 tsp toasted sesame oil: Adds a nutty, aromatic finish.
- 0.5 cup vegetable broth: The liquid base for the sauce.
- 1 tbsp cornstarch (for sauce): To create that glossy thickness.
- 3 cloves garlic, minced: The foundation of the aromatics.
- 1 tbsp fresh ginger, grated: For heat and freshness.
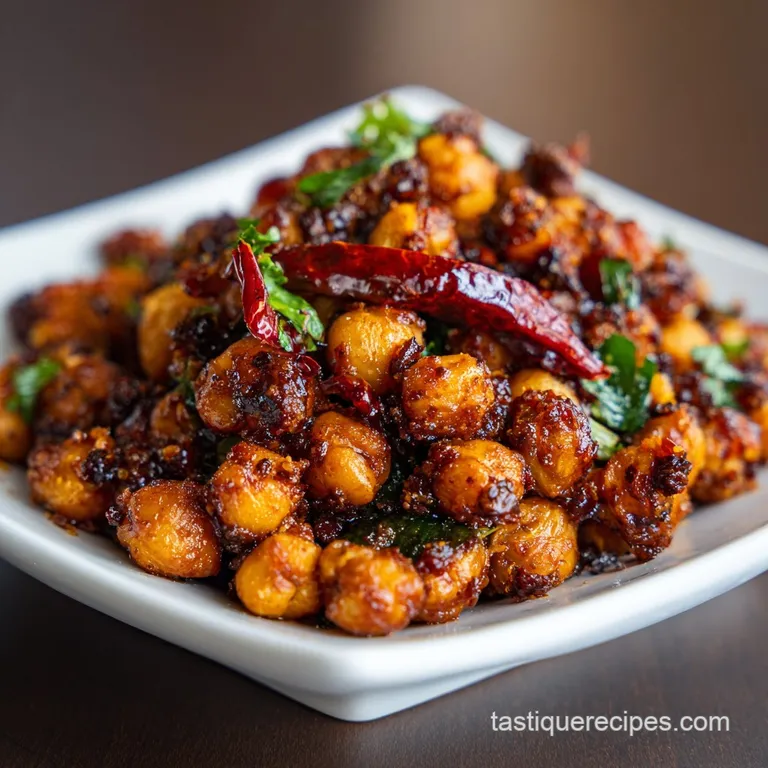
- 4 dried red chilies: Adjust this based on your heat tolerance.
- 3 green onions: Separated into whites (for cooking) and greens (for garnish).
For a truly authentic feel, you might want to serve this alongside something cooling. This dish pairs perfectly with my Vegan Japanese Curry recipe if you are planning a multi course dinner with friends. The earthy tones of the curry complement the bright, spicy notes of the Tso sauce.
Component Analysis
| Ingredient | Science Role | Pro Secret |
|---|---|---|
| Cornstarch | Moisture Absorber | Toss chickpeas in a sealed bowl for a perfectly even, thin coating. |
| Tomato Paste | Umami Booster | Sauté the paste with the garlic for 60 seconds to "bloom" the flavor. |
| Rice Vinegar | PH Balancer | Use unseasoned vinegar to control the sugar levels yourself. |
Must Have Tools for over High heat Cooking
You don't need a professional kitchen, but a few specific tools will make your life much easier. A large carbon steel wok or a heavy bottomed cast iron skillet (like a Lodge) is ideal.
These materials retain heat exceptionally well, which is vital for maintaining the temperature when you add the cold chickpeas to the pan.
A microplane is also a game changer for the ginger and garlic. It creates a texture that is almost like a purée, allowing the aromatics to distribute evenly through the sauce. Finally,, grab a silicone spatula.
You'll need to scrape every bit of that golden glaze from the sides of the pan; it's where all the concentrated flavor lives.
Master the Multi Phase Cooking Process
Phase 1: The Triple Dry Prep
- Drain and rinse 30 oz canned chickpeas. Place them on a clean towel and pat them until they are completely matte.
- Toss with 3 tbsp cornstarch and 0.5 tsp sea salt. Ensure every chickpea is thinly coated. Note: Excess starch will burn, so shake off any clumps.
Phase 2: Searing for Texture
- Heat 2 tbsp avocado oil in a large skillet over medium high heat. Wait until the oil is shimmering and faint wisps of smoke appear.
- Add the chickpeas in a single layer. Fry for 8-10 minutes, tossing occasionally, until the shells are golden brown and sound hollow when tapped. Remove them from the pan and set aside.
Phase 3: Building the Flavor Base
- In a small bowl, whisk 0.25 cup soy sauce, 2 tbsp rice vinegar, 2 tbsp maple syrup, 1 tbsp tomato paste, 1 tsp sesame oil, 0.5 cup vegetable broth, and 1 tbsp cornstarch.
- In the same skillet, add the whites of the 3 green onions, 3 minced garlic cloves, 1 tbsp grated ginger, and 4 dried red chilies. Sauté for 1 minute until the aroma is sharp and fragrant.
Phase 4: The Final Glaze
- Pour the sauce mixture into the skillet. Stir constantly as it comes to a simmer.
- Watch for the color change. The sauce will go from cloudy to a deep, translucent mahogany.
- Return the chickpeas to the pan. Toss quickly to coat every surface in the bubbling glaze.
- Garnish with the green onion tops. Serve immediately while the texture is at its peak.
For another variation on umami rich noodles that would go great with this, check out my Vegan Dan Dan recipe. The creamy tahini base provides a nice contrast to the sharp vinegary notes here.
Fixing Sauce and Texture Troubles
Why Your Chickpeas Are Soggy
This is usually caused by one of two things: overcrowding or moisture. If you put too many chickpeas in the pan at once, the temperature drops, and they steam instead of fry. Also, if you let the chickpeas sit in the sauce for too long before serving, that crisp starch shield will eventually hydrate and turn soft.
The Sauce is Too Thick
If the sauce turns into a gelatinous glob, don't panic. This happens if the cornstarch slurry boils for too long or if the ratio of liquid was slightly off. Simply whisk in 1-2 tablespoons of hot water or vegetable broth to thin it out. The heat will help it reintegrate and become silky again.
| Problem | Root Cause | Solution |
|---|---|---|
| Floury taste | Cornstarch didn't cook through | Increase heat and sear for 2 more minutes before adding sauce. |
| Sauce won't thicken | Starch was not whisked properly | Mix 1 tsp cornstarch with 1 tbsp cold water and stir in. |
| Bitter flavor | Garlic or spices burned | Remove from heat immediately and add a splash of maple syrup. |
Common Mistakes Checklist
- ✓ Never skip the drying step; wet chickpeas equal a gummy disaster.
- ✓ Preheat your skillet for at least 3 minutes before adding oil.
- ✓ Use a "slurry" (cold liquid + starch) to avoid lumps in your sauce.
- ✓ Don't use toasted sesame oil for frying; save it for the final seasoning.
- ✓ Work in batches if your pan is small to ensure maximum crispiness.
Flavor Variations and Ingredient Swaps
If you are looking to change things up, this recipe is incredibly flexible. You can swap the protein or the sweetener depending on what you have in your pantry. Just keep in mind that some swaps will change the final texture or the "gloss" of the sauce.
| Original Ingredient | Substitute | Why It Works |
|---|---|---|
| Maple Syrup | Agave Nectar | Similar viscosity and sweetness level. |
| Soy Sauce | Tamari | Makes the dish gluten-free without losing umami. |
| Avocado Oil | Grapeseed Oil | Both have high smoke points and neutral flavors. |
If you want to try something really unique, you could even use the sauce technique from my Vegan Cashew Glaze recipe as a base for a creamier, nuttier version of this stir fry.
Smart Storage and Zero Waste Tips
Storage Guidelines: Store any leftovers in an airtight container in the fridge for up to 3 days. Be aware that the chickpeas will lose their crunch as they sit in the sauce. To revive them, I recommend reheating them in an air fryer at 180°C for 4-5 minutes.
This will help re dehydrate the starch coating. Avoid the microwave if you can, as it will make them quite chewy.
Zero Waste Tips: Don't throw away that chickpea liquid (aquafaba)! You can use it as an egg replacement in baking or whip it into a vegan mayo. The white parts of the green onions can be placed in a small jar of water on your windowsill they will literally grow back in a week.
Also, if you have leftover sauce, it makes a fantastic marinade for tofu or a dressing for a quick cold noodle salad the next day.
How to Serve Your Final Masterpiece
Presentation is half the battle with a dish like this. I love serving these chickpeas over a bed of fluffy jasmine rice or even some quinoa if I'm feeling fancy. The bright green of the scallions against the dark, glossy sauce is stunning.
If you want to go the extra mile, a sprinkle of toasted sesame seeds or some thinly sliced fresh chilies adds that restaurant quality finish.
Don't forget the "If you want X, do Y" rule for serving: If you want a spicier kick, add a teaspoon of chili garlic sauce (like Sambal Oelek) to the liquid mix. If you want more crunch, double the amount of cornstarch in the initial coating phase.
If you want a fresher finish, squeeze half a lime over the bowl just before eating.
Kitchen Myths Debunked
"You must deep fry to get a crunch." This is simply not true. While deep frying is efficient, a properly starched and seared chickpea can achieve 90% of that texture with 10% of the oil. The key is the dehydration of the starch surface, which happens perfectly well in a hot skillet.
"Canned chickpeas are inferior to dried." While dried chickpeas have a better texture for some dishes, the high moisture content of canned chickpeas actually helps the cornstarch adhere better, making them the superior choice for this specific quick sear method. Trust me, the convenience is a bonus, not a compromise.
Finally, if you're looking for a refreshing drink to pair with this spicy meal, try making a batch of my Homemade Yakult Recipe. The probiotic tang is the perfect palate cleanser between bites of savory, spicy chickpeas. It rounds out the whole "takeout at home" experience beautifully.

High in Sodium
885 mg of sodium per serving (38% of daily value)
The American Heart Association recommends limiting sodium intake to about 2,300mg per day for optimal health.
Tips to Reduce Sodium in This Recipe
-
Low-Sodium Broth-30%
Use low-sodium or no-salt added vegetable broth. This simple swap can significantly reduce the overall sodium content. It also allows you to control the flavor of your broth better.
-
Reduce Sea Salt-25%
Halve the amount of sea salt. You can always add more to taste, but start with less. This will allow you to better control the overall sodium level.
-
Fresh Chickpeas-20%
Use freshly cooked chickpeas instead of canned, which naturally have less sodium. If using canned, be sure to rinse thoroughly.
-
Low-Sodium Soy Sauce-15%
Even low-sodium soy sauce can be high in sodium. Try a no-sodium added soy sauce alternative and adjust the flavor with a little extra rice vinegar and maple syrup.
-
Spice it Up!
Enhance the flavor of the dish with more herbs and spices like black pepper, garlic powder (instead of garlic salt), or onion powder to compensate for the reduced sodium. This will increase the complexity of flavor and reduce the dependence on salt.
Recipe FAQs
Can I substitute the chickpeas with tofu or tempeh?
Yes, but adjust your searing time. Tofu requires pressing to remove excess water, unlike canned chickpeas, so budget an extra 15 minutes for that crucial prep step before coating and frying.
How do I ensure the coating stays crispy after being coated in sauce?
Use a high ratio cornstarch-to-liquid slurry for the glaze. The starch forms a barrier, but you must toss the chickpeas in the glaze very quickly right before serving to minimize the time the sauce sits on the crisp exterior.
How do I prevent the sauce from burning when using maple syrup?
Simmer the sauce only until it coats the back of a spoon. High heat causes the sugars in maple syrup to caramelize too fast; reduce the heat slightly once the sauce is thickened and incorporate the chickpeas quickly.
Is it true I must use a wok for this recipe to work?
No, this is a common misconception. A heavy bottomed cast iron skillet works just as well because its ability to retain high heat mimics the thermal mass of a wok during the initial sear.
What is the minimum drying time required for the canned chickpeas?
Pat them until they feel completely matte to the touch. This usually takes about 3 to 5 minutes of vigorous rolling between two clean towels to remove surface moisture that impedes starch adhesion.
How can I add more savory depth to the glaze without using traditional oyster sauce?
Sauté the tomato paste with the aromatics before adding liquids. Browning the tomato paste blooms its umami compounds; if you want a permanent alternative, try substituting with our Vegan Oyster Sauce recipe for an immediate boost.
How to reheat leftovers to restore crispiness?
Reheat in an air fryer at 180°C for 4 5 minutes. The dry heat effectively re-dehydrates the cornstarch coating, bringing back much of the original crunch better than microwaving.
Vegan General Tso Chickpeas
Ingredients:
Instructions:
Nutrition Facts:
| Calories | 345 kcal |
|---|---|
| Protein | 11.2 g |
| Fat | 10.4 g |
| Carbs | 46.8 g |
| Fiber | 9.2 g |
| Sugar | 6.5 g |
| Sodium | 885 mg |
