Japanese Milk Bread Rolls Recipe
- Time: Active 45 minutes, Passive 2 hours 35 mins, Total 3 hours 20 mins
- Flavor/Texture Hook: Cotton candy soft with a buttery, milky shred
- Perfect for: Impressive dinner parties, specialized sliders, or luxurious morning toast
- The Secret To Japanese Milk Bread Rolls
- Pro Dough Techniques Explained
- Specific Recipe Details
- Pantry Staples and Substitutes
- Required Kitchen Gear
- Step-By-Step Baking Guide
- Troubleshooting Common Dough Issues
- Creative Variations and Swaps
- Solving Common Bread Myths
- Storage and Zero Waste
- Perfect Ways To Serve
- Recipe FAQs
- 📝 Recipe Card
The Secret To Japanese Milk Bread Rolls
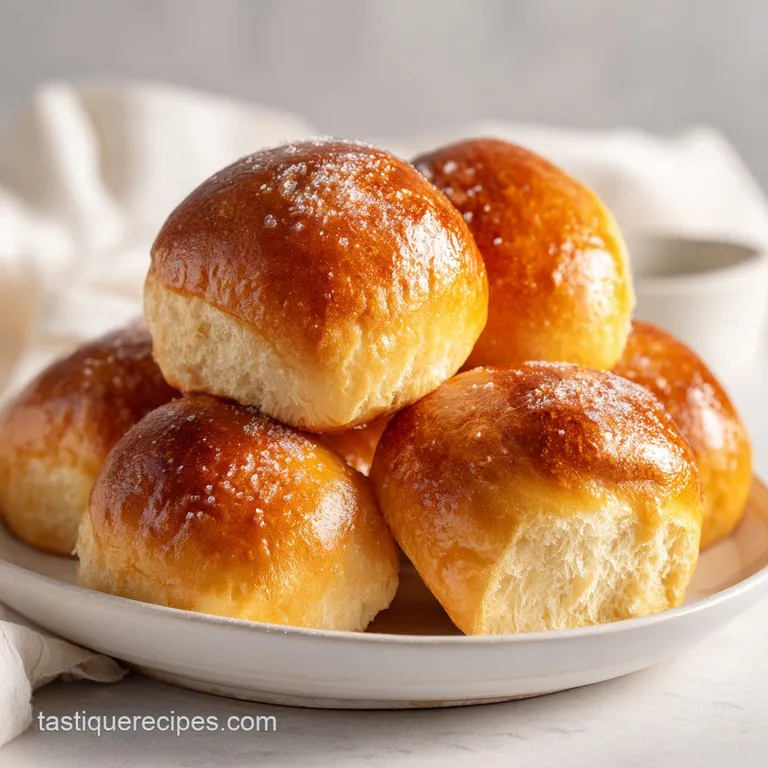
Close your eyes and imagine pulling apart a warm roll only to have it resist slightly, then peel away in long, feathery white shreds like a cloud. That first whiff isn't just "bread" - it's a sweet, floral, almost nostalgic milky aroma that fills the entire kitchen.
I remember the first time I pulled these out of the oven, I didn't even wait for them to cool. I just tore into one, and the way it felt against my fingers velvety and impossibly light changed my standard for bread forever.
You've probably seen these in high end Asian bakeries, glowing under the lights with a perfectly golden, egg washed sheen. For years, I thought there was some industrial secret or chemical magic involved in getting that texture.
But honestly, it's just about one simple technique that mimics what professional bakers do to keep bread fresh and moist without additives. We're going to use a cooked flour paste that locks in moisture so effectively, these rolls stay soft for days, though they rarely last that long in my house.
The beauty of this recipe lies in the contrast between the paper thin, golden crust and the pillowy interior. It's the kind of bake that makes you feel like a pro even if you've struggled with yeast in the past. We're moving away from the dense, crumbly rolls of the past and embracing a technique that focuses on hydration and gluten structure. If you've enjoyed making my Castella Cake Recipe, you'll recognize that same dedication to a refined, silky crumb here.
Pro Dough Techniques Explained
The magic happens because we are manipulating the starch molecules before they even meet the rest of the ingredients. By cooking a small portion of the flour and liquid, we create a "tangzhong," which is essentially a pre gelatinized roux.
This allows the dough to hold much more water than a standard recipe without becoming a sticky, unmanageable mess. It's a bridge between traditional bread making and modern moisture retention.
- Starch Gelatinization: Cooking flour with milk and water at 65°C (150°F) causes starch granules to swell and trap liquid, keeping the final bread moist.
- Protein Alignment: High protein bread flour provides the structural "scaffold" needed to support the high rise and airy pockets.
- Fat Emulsification: Adding softened butter slowly during the kneading process coats gluten strands, ensuring the crumb remains tender rather than chewy.
- Slow Fermentation: The sugar feeds the yeast while the milk solids provide the enzymes necessary for a deep, complex flavor profile.
| Cook Method | Time | Texture | Best For |
|---|---|---|---|
| Standard Oven | 20 minutes | Uniformly golden and airy | Classic dinner rolls |
| Stovetop Dutch Oven | 30 minutes | Crustier bottom, very moist | Small batches without an oven |
| Air Fryer | 15 minutes | Darker crust, denser center | Quick single servings |
The temperature of your ingredients matters more than you might think. Yeast is a living organism, and if you hit it with milk that's too hot, you'll kill it instantly. Conversely, cold milk will make your rise take forever. Aim for lukewarm, around 100°F (38°C).
This is the "Goldilocks" zone where the yeast wakes up happy and ready to work.
Specific Recipe Details
Before we get our hands floury, let's look at the logistics. This recipe is designed for a standard 9x13 inch baking pan, which fits 12 rolls perfectly. It's a medium effort bake, mostly because of the waiting time, but the active work is quite therapeutic. If you find yourself enjoying the process of working with specialized flours, you might eventually want to experiment with my Kamut Flour Bread recipe for a different nutritional profile.
Precision Checkpoints
- Tangzhong Temperature: Cook until it reaches exactly 150°F (65°C) or becomes a thick, translucent paste.
- Kneading Duration: 10 minutes by stand mixer on medium low or 15 minutes by hand until the "windowpane test" is passed.
- Internal Doneness: The rolls are finished when a digital thermometer reads 190°F (88°C) in the center.
| Component | Science Role | Pro Secret |
|---|---|---|
| Tangzhong | Moisture Retention | Let it cool completely before adding to the dough to avoid scrambling the egg. |
| Bread Flour | Structural Integrity | Use a brand with at least 12% protein for the best "shred" effect. |
| Whole Milk | Tenderness & Fat | The milk sugars (lactose) contribute to that signature dark golden crust color. |
Don't be tempted to use all purpose flour here if you can avoid it. While it works in a pinch, the lower protein content means your rolls won't have that dramatic, sky high rise. They’ll be soft, sure, but they won't have that elastic "pull" that makes this specific bread famous.
Pantry Staples and Substitutes
The ingredient list for these rolls is surprisingly short. You likely have most of this in your kitchen already. The key is quality. Use fresh yeast if that packet has been in the back of your cupboard since three Thanksgivings ago, toss it and get a new one. Your bread's life depends on it.
- 20g bread flourWhy this? Essential for the starter base. (Sub: All purpose flour - slightly less stable)
- 60ml whole milkWhy this? Adds richness to the roux. (Sub: Water - less creamy flavor)
- 60ml waterWhy this? Thins the starter for even cooking. (Sub: Milk - richer result)
- 350g bread flourWhy this? Provides high protein for gluten. (Sub: High protein AP flour)
- 50g granulated sugarWhy this? Feeds yeast and adds sweetness. (Sub: Honey - use 40g)
- 7g instant yeastWhy this? Fast acting and reliable rise. (Sub: Active dry yeast - bloom first)
- 1 tsp fine sea saltWhy this? Tightens gluten and balances sugar. (Sub: Kosher salt - use 1.5 tsp)
- 120ml lukewarm whole milkWhy this? Liquid base for the main dough. (Sub: 2% milk - lower fat)
- 1 large eggWhy this? Adds structure and yellow tint. (Sub: 1/4 cup plain yogurt)
- 50g unsalted butterWhy this? Creates the velvety mouthfeel. (Sub: Vegan butter - higher water content)
| Original Ingredient | Substitute | Why It Works |
|---|---|---|
| Whole Milk | Full fat Oat Milk | High fat and sugar content mimic dairy well. |
| Unsalted Butter | Coconut Oil (solid) | Provides the necessary fat. Note: Adds a slight tropical scent. |
| Bread Flour | Type 00 Flour | Very fine texture, though may require 5% less liquid. |
If you decide to swap the sugar for honey, keep in mind that honey is more hygroscopic (it attracts water), so your dough might feel a bit stickier. It’s a small trade off for that lovely floral depth.
Required Kitchen Gear
You don't need a bakery full of equipment, but a few tools make this much easier. A stand mixer is your best friend here because the dough is quite tacky initially. Kneading by hand is possible, but it’s a workout!
- Small saucepan: For whisking the tangzhong.
- Stand mixer: Fitted with a dough hook (e.g., KitchenAid).
- Digital scale: Baking by weight is non negotiable for consistent rolls.
- 9x13 inch baking pan: Glass or metal both work well.
- Pastry brush: For that essential egg wash.
- Instant read thermometer: To check the internal temperature.
Chef's Tip: If you don't have a pro style proofing box, turn your oven on for exactly 60 seconds, then turn it off. Place your dough inside with a bowl of hot water. The residual heat and steam create the perfect tropical environment for the yeast to thrive.
step-by-step Baking Guide

1. Defining The Tangzhong Method
In your small saucepan, whisk together the 20g flour, 60ml milk, and 60ml water until no lumps remain. Place over medium low heat and stir constantly with a spatula. Cook about 3 minutes until the whisk leaves lines in the paste. It should look like thick mashed potatoes.
Transfer to a small bowl and press plastic wrap directly onto the surface to prevent a skin from forming. Let it cool to room temperature.
2. The Initial Mix
In the bowl of your stand mixer, whisk the 350g bread flour, sugar, yeast, and salt. Make a well in the center and add the 120ml lukewarm milk, the egg, and your cooled tangzhong. Mix on low speed until a shaggy dough forms.Note: It will look messy at first, but don't add more flour yet.
3. Developing The Structure
Increase the speed to medium low and knead for 5 minutes. The dough should start to pull away from the sides of the bowl. Check that the dough feels stretchy and slightly tacky. If it’s sticking aggressively to the bottom, add one tablespoon of flour at a time until it clears the bowl.
4. Incorporating The Fat
Add the 50g of softened butter one tablespoon at a time while the mixer is running. Wait for each piece to vanish before adding the next. This process takes patience but ensures the fat is perfectly emulsified into the gluten.
Continue kneading for another 5-7 minutes until the dough is smooth, supple, and passes the windowpane test (you can stretch a small piece until it's translucent without it tearing).
5. The First Rise
Shape the dough into a smooth ball and place it in a lightly greased bowl. Cover with a damp cloth. Let it rise in a warm spot for 60-90 minutes until doubled in size. You'll know it's ready when you poke it with a floured finger and the indentation stays.
6. Shaping The Rolls
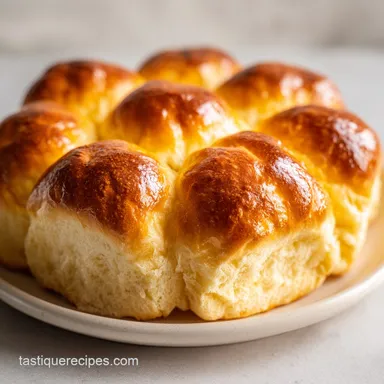
Gently deflate the dough and weigh the entire mass. Divide the total weight by 12 to get even pieces (usually around 60-65g each). Flatten each piece into a disc, fold the edges into the center, and roll it on the counter under your palm to create tension.
Place the 12 balls in your greased baking pan in a 3x4 grid.
7. The Second Proof
Cover the pan and let the rolls rise again for 45-60 minutes. They should look puffy and be touching each other.Note: This second rise is where the "feathery" texture is finalized, so don't rush it.
8. The Golden Bake
Preheat your oven to 350°F (180°C). Whisk the extra egg and tablespoon of milk to create an egg wash. Brush the tops gently, ensuring you don't pop the air bubbles. Bake for 20-22 minutes until the tops are a deep mahogany gold.
9. The Finishing Touch
As soon as they come out of the oven, brush the tops with the remaining tablespoon of melted butter. This softens the crust and gives it a professional shine. Let them cool in the pan for 10 minutes before transferring to a wire rack.
Troubleshooting Common Dough Issues
Even the best bakers have "off" days. Bread is sensitive to humidity, the age of your flour, and even the temperature of your kitchen. If your dough isn't behaving, don't panic. Most issues are fixable before the bake.
Solving Sticky Dough Problems
If your dough feels like glue and won't come off your hands, it's likely a hydration issue. This happens often in humid climates. Instead of dumping in cups of flour (which makes the bread heavy), try the "slap and fold" technique or give the dough a 10 minute rest.
Often, the flour just needs time to fully absorb the liquid.
Solving Poor Rise Problems
If your rolls look like sad little pebbles after an hour, your yeast might be dead or your environment is too cold. Check the expiration date on your yeast. If the yeast is fine, move the dough to a warmer spot.
Never place dough directly on a hot radiator, as this will cook the bottom and kill the yeast. A microwave with a cup of steaming water is a great makeshift proofing box.
| Problem | Root Cause | Solution |
|---|---|---|
| Dense, heavy rolls | Under kneaded dough | Knead until it passes the windowpane test; check gluten. |
| Crust is too thick | Oven temperature too low | Increase temp by 15°F and shorten bake time. |
| Rolls collapsed | Over proofing | Reduce second rise time; don't let them more than double. |
Common Mistakes Checklist
- ✓ Using cold eggs or butter (this slows down the yeast significantly).
- ✓ Skipping the tangzhong cooling step (hot paste will kill your yeast).
- ✓ Adding too much extra flour during kneading (this ruins the hydration ratio).
- ✓ Not creating enough surface tension when shaping the balls.
- ✓ Pulling them out of the oven too early (check for that 190°F internal temp).
Creative Variations and Swaps
Once you've mastered the basic rolls, the possibilities are endless. This dough is essentially a "master dough" for dozens of Japanese pastries.
- Sweet Cinnamon Swirls: Roll the dough into a rectangle, spread with cinnamon butter, and roll up like a log before cutting.
- Savory Garlic Herb: Mix 1 tsp of garlic powder into the dough and top with parsley butter after baking.
- Black Sesame: Add 2 tablespoons of toasted black sesame paste to the main dough for a nutty, grey marbled look.
If you want X, do Y:If you want a crispier crust, skip the final butter brush and bake with a small tray of water in the bottom of the oven. If you want dinner sliders, reduce the sugar to 20g and add 1/2 tsp of onion powder.
If you want a vegan version, use soy milk and a high-quality vegan butter block.
If you’re looking for a different way to use this bread, it makes an incredible base for a Japanese Fruit Sandwich recipe. The sweetness of the bread complements the whipped cream and fresh strawberries perfectly.
Solving Common Bread Myths
Myth: Kneading by hand is better for "soulful" bread. Truth: While romantic, a stand mixer provides consistent mechanical energy that is much better at developing the strong gluten bonds needed for the specific "shred" of milk bread. Your "soul" is better spent on the shaping!
Myth: You must use bread flour or it will fail. Truth: You can use all purpose, but the rolls will be more like standard American dinner rolls soft, but lacking the elastic, chewy pull that defines the Japanese style.
Myth: Sugar is just for flavor. Truth: In this recipe, sugar acts as a tenderizer by interfering with gluten formation just enough to keep the crumb soft. It also helps the crust brown through the Maillard reaction.
Storage and Zero Waste
These rolls stay fresh longer than standard bread thanks to the tangzhong, but they are still best within 48 hours. Store them in an airtight bag at room temperature.
Never store bread in the fridge, as the cold temperature actually accelerates the staling process (retrogradation of starch).
For long term storage, these freeze beautifully. Wrap individual rolls in plastic wrap, then place them in a freezer bag. They’ll last for up to 3 months. To reheat, just pop a frozen roll in the microwave for 20-30 seconds, or wrap in foil and heat in a 300°F oven for 10 minutes until they feel squishy again.
Zero Waste Tip: If you have rolls that have gone truly stale, don't toss them! This high fat, high sugar bread makes the absolute best French toast or bread pudding you've ever had. Because the crumb is so dense and structured, it soaks up custard without falling apart.
You can also dry them out in a low oven and pulse them in a food blender for the most luxurious, buttery breadcrumbs imaginable.
Perfect Ways To Serve
While these are spectacular on their own, I love serving them with a side of salted cultured butter. The slight saltiness cuts through the milky sweetness of the roll. If you're feeling adventurous, try making a batch of Spicy Potato Stuffed recipe as a side for a multi texture bread feast.
For a true Tokyo style brunch, slice a roll in half but not all the way through. Toast the inside lightly and fill it with a cold egg salad (Tamago Sando style). The contrast between the warm, soft bread and the cool, creamy egg is a texture sensation.
Or, if you have a sweet tooth, a thick swipe of condensed milk and a sprinkle of sugar is a childhood classic for many. These rolls are a canvas treat them with the respect their fluffy texture deserves!

Recipe FAQs
What is the primary benefit of the Tangzhong method used in this recipe?
It maximizes moisture retention. The cooked flour paste gelatinizes the starch, allowing the dough to hold significantly more water, which keeps the rolls soft for days.
Can I substitute bread flour with all-purpose flour for these rolls?
No, you should stick to bread flour for the best results. All-purpose flour has lower protein content, which means your rolls will achieve a soft texture but will lack the dramatic height and signature elastic shred.
How do I ensure my dough proofs correctly in a cool kitchen environment?
Create a warm, humid spot for the dough. Turn your oven on for one minute, then turn it off, place a bowl of hot water inside, and seal the door to mimic a professional proofing box.
When should I add the softened butter to the dough mixture?
Add the butter slowly, one tablespoon at a time, after the initial gluten structure has formed. Ensure each piece is fully incorporated before adding the next to achieve perfect emulsification.
How do I know when the Japanese milk bread rolls are fully baked internally?
Check the center temperature with a thermometer, aiming for 190°F (88°C). Visually they will be deeply golden brown, but temperature ensures the interior starches are set without drying out the crumb.
If I make the Tangzhong starter ahead of time, how long can it be stored?
It can be refrigerated for up to 24 hours. Make sure to press plastic wrap directly onto the surface to prevent a skin from forming, which keeps the texture smooth for when you incorporate it later.
Is it true that storing these rolls in the refrigerator will keep them fresher?
False. Storing bread in the refrigerator accelerates staling. Keep them tightly sealed at room temperature, or freeze them for long term freshness; if you enjoy enriched doughs, mastering this technique translates well to making richer items like our Rye Flour Chocolate recipe.
Japanese Milk Bread Rolls
Ingredients:
Instructions:
Nutrition Facts:
| Calories | 189 kcal |
|---|---|
| Protein | 5.3 g |
| Fat | 6.1 g |
| Carbs | 26.6 g |
| Fiber | 0.8 g |
| Sugar | 5.1 g |
| Sodium | 201 mg |
