Buttery Brown Sugar Cinnamon Cookies 3: Crispy and Velvety
- Time:15 minutes active + 10 minutes baking = Total 25 minutes
- Flavor/Texture Hook: Mahogany crisp edges with a warm, spicy aroma
- Perfect for: Quick afternoon cravings or a cozy holiday treat
- Buttery Brown Sugar Cinnamon Cookies 3
- The Essential Building Blocks
- Necessary Baking Equipment
- Step by Step Baking Process
- Fixing Common Baking Problems
- Troubleshooting Common Issues
- Smart Dietary Adaptations
- Common Baking Myths
- Storage and Freshness Tips
- Serving and Presentation Ideas
- Recipe FAQs
- 📝 Recipe Card
That first scent hits you the second the butter and cinnamon meet the heat. It's not just a smell, it's like a warm blanket for your kitchen. I remember making these on a Tuesday when the rain was just hammering against the windows and the house felt a bit too chilly.
I wanted something that felt like a hug in cookie form, but I was tired of the same old snickerdoodles.
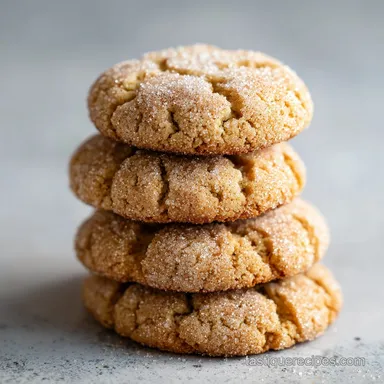
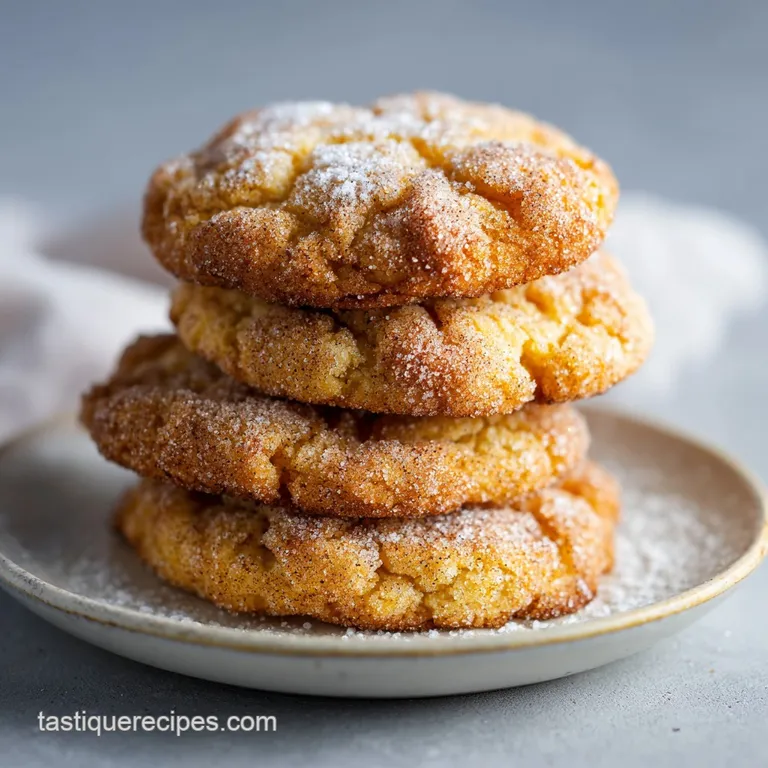
I decided to lean harder into the brown sugar and a double coating method. The result was this mahogany colored edge that almost shatters when you bite into it, leading into a center that's soft, buttery, and rich.
These aren't just simple sweets, they're the kind of treats that make the whole neighborhood wonder what you're baking.
You can expect a cookie that balances the deep, molasses notes of light brown sugar with a punchy cinnamon kick. We're going for a specific texture here - not cakey, not runny, just a solid, chewy bite.
This buttery brown sugar cinnamon cookies 3 approach ensures you get that high end bakery feel without needing a professional kitchen.
Buttery Brown Sugar Cinnamon Cookies 3
The Secret to the Chew
- Sugar Balance
- The high ratio of brown sugar creates more moisture and acidity, which keeps the center velvety.
- Butter Dip
- Coating the dough in melted butter before the sugar creates a fried like crispness on the exterior.
- Temperature Control
- Baking at a higher temp for a shorter time sets the edges quickly while leaving the middle tender.
- Leavening Speed
- Baking soda reacts quickly with brown sugar, giving us a fast rise and a tender crumb.
| Feature | Fast Method | Classic Method | Best For |
|---|---|---|---|
| Prep Time | 15 minutes | 45 minutes | Fast Method for cravings |
| Dough Rest | None | 2 hours | Classic for less spread |
| Texture | Chewier center | More uniform | Fast for "bakery style" |
The Essential Building Blocks
Before we get into the mixing, let's look at the logistics. Precision is your best friend when you're working with flour. I always suggest you measure the flour correctly so your cookies don't end up like hockey pucks.
Component Analysis
| Ingredient | Science Role | Pro Secret |
|---|---|---|
| Unsalted Butter | Fat and Flavor | Softened, not melted, for air pockets |
| Light Brown Sugar | Moisture and Color | Packed tight to ensure molasses content |
| Baking Soda | Lift and Browning | Reacts with sugar for that mahogany edge |
| Ground Cinnamon | Aromatic Profile | Freshly bought for a punchier scent |
The Grocery List
- 1 cup unsalted butter, softened Why this? Provides the rich, velvety base
- 1 1/2 cups light brown sugar, packed Why this? Adds chew and deep caramel notes
- 1/2 cup granulated sugar Why this? Helps with the crisp edges
- 1 large egg, room temperature Why this? Binds everything without breaking the emulsion
- 1 tsp vanilla extract Why this? Rounds out the spice
- 2 1/4 cups all purpose flour Why this? Standard structure for a soft bite
- 1 tsp baking soda Why this? Essential for the rise
- 2 tsp ground cinnamon Why this? The primary flavor driver
- 1/2 tsp salt Why this? Cuts through the sweetness
- 2 tbsp melted butter Why this? For the outer coating
- 1/4 cup granulated sugar Why this? For the outer coating
- 1 tsp ground cinnamon Why this? For the outer coating
| Original Ingredient | Substitute | Why It Works |
|---|---|---|
| Light Brown Sugar | Dark Brown Sugar | More molasses. Note: Stronger flavor, darker color |
| All Purpose Flour | White Whole Wheat | Adds nuttiness. Note: Denser crumb, less spread |
| Unsalted Butter | Salted Butter | Works fine. Note: Reduce added salt by 1/4 tsp |
Necessary Baking Equipment
You don't need a fancy lab, but a few specific tools make this a breeze. I personally use a stand mixer such as KitchenAid for the creaming process, but a hand mixer works just as well.
- Baking sheets (two large ones)
- Parchment paper or silicone mats
- Electric mixer
- Small mixing bowls (three)
- Wire cooling rack
- Measuring cups and spoons
- Cookie scoop (1 tablespoon size)
Chef's Note: If you don't have parchment paper, grease your pans with butter and a dusting of flour. Just be careful, as the cinnamon sugar coating can stick to bare metal and burn.
Step by step Baking Process
Phase 1: Preparing the Base
- Cream together the softened butter, brown sugar, and granulated sugar on medium high speed for 3-4 minutes until the texture is pale and fluffy. Note: This incorporates air for a better rise
- Beat in the egg and vanilla extract until the mixture is fully emulsified and smooth.
Phase 2: Folding in Dry Ingredients
- In a separate bowl, whisk together the flour, baking soda, cinnamon, and salt.
- Gradually add the dry ingredients to the wet mixture on low speed, mixing only until no streaks of flour remain. Note: Stop immediately to avoid a cakey texture
Phase 3: Rolling and Coating
- Scoop about 1 tablespoon of dough and roll into a ball.
- Quickly dip the dough ball into the melted butter, then roll it in the cinnamon sugar mixture until fully coated.
Phase 4: Baking and Cooling
- Place the balls 2 inches apart on lined baking sheets.
- Bake at 375°F (190°C) for 8-10 minutes until the edges are mahogany colored and set, but the centers remain slightly soft.
- Allow cookies to firm up on the baking pan for 5 minutes until they stop wobbling before transferring them to a wire cooling rack.
Fixing Common Baking Problems

We've all been there - the cookies come out looking like pancakes or they're hard as rocks. Usually, it's just a small tweak in temperature or timing.
Troubleshooting Common Issues
| Issue | Solution |
|---|---|
| Why Your Cookies Spread Too Much | This usually happens when the butter is too warm or the oven isn't quite at temp. When the fat melts before the flour structure sets, the cookie collapses outward. |
| Why Your Cookies Are Too Cakey | Overmixing the flour is the main culprit here. When you beat the dough too long, you develop gluten, which turns a chew into a bread like texture. |
| Why the Bottoms Burn | If you use a dark colored baking sheet, they absorb more heat. You might need to slide a second sheet underneath them or lower the temp by 10 degrees. |
Common Mistakes Checklist:
- ✓ Ensure butter is "cool room temp" (indents with a finger but doesn't shine).
- ✓ Don't over mix the flour; stop at the first sign of integration.
- ✓ Keep the oven door closed until the 8 minute mark.
- ✓ Use a timer; 2 extra minutes can turn "chewy" into "hard".
- ✓ Let the pan cool between batches so the butter doesn't melt instantly.
Smart Dietary Adaptations
If you're looking to change things up, you can easily tweak these buttery brown sugar cinnamon cookies 3. For those who love a nuttier profile, my Peanut Butter Cookies are a great alternative for a different kind of comfort.
Adjusting the Batch Size
Scaling Down (Half Batch): Use 1/2 cup butter and 3/4 cup brown sugar. Since you can't easily halve an egg, beat one egg in a cup and use exactly 2 tablespoons. Reduce bake time by about 1-2 minutes.
Scaling Up (Double Batch): When doubling, don't double the salt or baking soda fully - go to 1.5x instead. This prevents a metallic taste. Work in batches to avoid overcrowding your oven, which can drop the temperature.
| Variation | Adjustment | Impact |
|---|---|---|
| gluten-free | 1:1 GF Flour Blend | Slightly more fragile texture |
| Vegan | Vegan Butter & Flax Egg | Earthier taste, less spread |
| Maple Twist | Swap 1/4 cup sugar for Maple Syrup | More moist, deeper flavor |
Common Baking Myths
Myth: Room temperature butter is just a suggestion. Truth: It's actually vital. If the butter is too cold, it won't trap air during creaming. If it's too hot, your cookies will melt into one giant sheet on the pan.
Myth: Adding more flour stops the spreading. Truth: While it helps, too much flour makes the cookie dry and bland. The real secret to controlling spread is chilling the dough or ensuring your oven is properly preheated.
Myth: You must let cookies cool completely to eat them. Truth: While they set as they cool, the "magic window" for flavor is about 5 minutes after they leave the oven. That's when the buttery notes are most vivid.
Storage and Freshness Tips
To keep these treats from going stale, store them in an airtight container. I find that adding a small piece of white bread to the container keeps them soft for days.
Fridge: Store for up to 5 days. They'll be denser and colder, which some people actually prefer. Freezer: Freeze the baked cookies for up to 3 months. Just wrap them tightly in foil and a freezer bag.
Zero Waste Tip: Don't throw away the butter wrappers! Use a rubber spatula to scrape every last bit of fat into the bowl. Also, if you have leftover cinnamon sugar coating, stir it into your morning oatmeal or sprinkle it over toasted sourdough.
Serving and Presentation Ideas
These look stunning when stacked in a pyramid on a wooden platter. The contrast between the mahogany edges and the golden centers is a visual treat.
For a truly whimsical treat, you could pipe a swirl of Vanilla Buttercream Frosting on top of a cooled cookie and add a tiny pinch of cinnamon. It turns a simple snack into a dessert worthy of a party.
If you're serving these for a brunch, pair them with a cold glass of almond milk or a sharp espresso. The bitterness of the coffee cuts through the richness of the buttery brown sugar cinnamon cookies 3, making every bite feel fresh.
For a little extra crunch, try adding a few chopped pecans to the dough before rolling.
Recipe FAQs
How to ensure the cookies stay soft and pillowy?
Store them in an airtight container with a small piece of white bread. The bread releases moisture that keeps the cookies from going stale for several days.
Is it true that room temperature ingredients are optional?
No, this is a common misconception. Room temperature butter and eggs are essential to ensure the mixture fully emulsifies into a smooth, fluffy batter.
How to keep the cookies from spreading too much on the tray?
Ensure your butter is softened but not melted and preheat your oven fully to 375°F. If the fat melts before the flour structure sets, the cookies will collapse outward. If you enjoyed controlling cookie spread here, the same fat ratio logic applies to our buckwheat chocolate chip cookies.
How to tell when the cookies are finished baking?
Look for mahogany colored, set edges while the centers remain slightly soft. Bake for 8-10 minutes and allow them to firm up on the pan for 5 minutes before moving them.
Can I prepare the dough in advance for later baking?
Yes, you can prepare the dough ahead of time. Store it in the refrigerator for up to 5 days, which some prefer as it results in a denser cookie.
What is the purpose of adding cream of tartar?
This recipe does not use cream of tartar. Baking soda provides the necessary leavening to achieve the desired rise and texture.
How to get the most intense cinnamon flavor?
Roll the dough balls in the cinnamon sugar mixture immediately after dipping them in melted butter. This creates a concentrated, flavorful crust on the outside of every cookie.
Buttery Brown Sugar Cinnamon Cookies