Peanut Butter Lunch Lady Bars: No-Bake Classic
- Time:15 minutes active + 2 hours chilling = Total 2 hours 15 mins
- Flavor/Texture Hook: Velvety chocolate top with a salty, buttery peanut butter snap
- Perfect for: School bake sales, late night cravings, or easy meal prep desserts
- Peanut Butter Lunch Lady Bars
- The Secret to the Set
- Component Analysis
- Gathering Your Essentials
- Necessary Kitchen Tools
- Making the Bars Step-by-Step
- Pro Secrets and Common Pitfalls
- Fun Flavor Twists
- Adjusting the Batch Size
- Myths About No Bake Bars
- Storage and Freezing Tips
- The Best Pairing Ideas
- Recipe FAQs
- 📝 Recipe Card
Ever wonder why some treats just taste like a specific memory? For me, it's that heavy, peanut scented air in a school cafeteria. I remember seeing these squares on a plastic tray and thinking they were the pinnacle of luxury. They weren't fancy, but they were reliable, salty, and ridiculously sweet.
I spent a few weekends trying to recreate that exact vibe at home. My first attempt was way too soft, almost like a paste, and the second one was so hard I nearly chipped a tooth. It turns out the secret isn't in the ingredients, but in the chill time and the way you press the base.
Once I figured out the timing, it became my go to for whenever I need a crowd pleaser. These peanut butter lunch lady bars aren't about being professional, they're about that comforting, old school flavor that makes you feel like you're ten years old again. Trust me, your friends will be asking for this recipe.
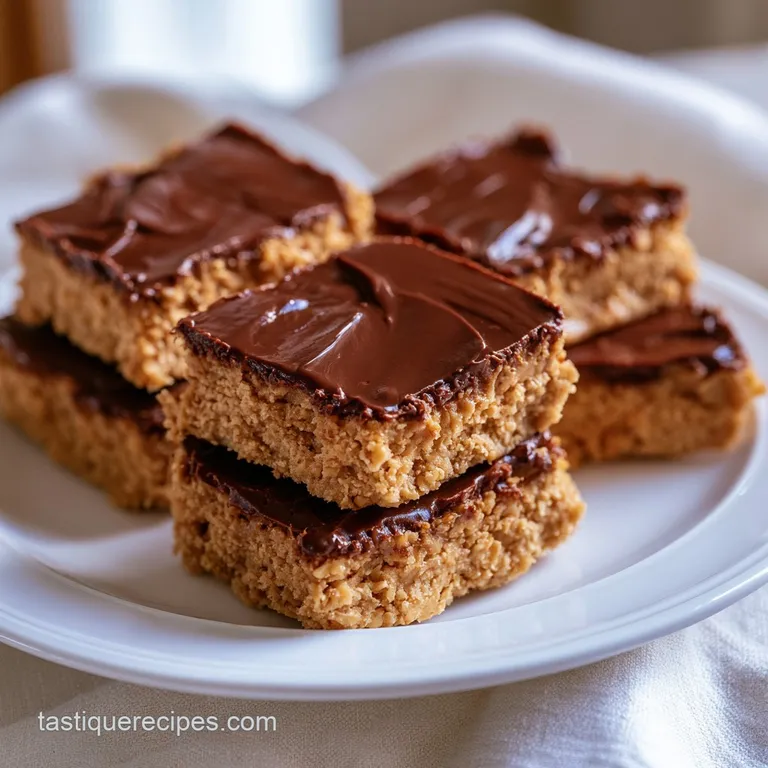
Peanut Butter Lunch Lady Bars
The most intriguing thing about this treat is the name. Why "lunch lady"? Because these bars feel like they were designed to be made in massive quantities in a giant industrial kitchen. They have a certain sturdiness to them that makes them perfect for packing in a lunchbox without them turning into a melted mess.
But don't let the simplicity fool you. There is a very specific balance here. If you use too much butter, the base slides right off the pan. Too little, and it feels like you're eating dry sand. We're aiming for a texture that's firm but gives way the moment it hits your tongue.
The smell is where the magic really happens. As you mix the melted butter with the peanut butter, the aroma fills the kitchen with this warm, nutty scent. Then comes the chocolate, which adds a deep, cocoa richness that cuts through the salt.
It's a simple combination, but it's practically a law of nature that peanut butter and chocolate belong together.
The Secret to the Set
I used to think this was just a "mix and chill" situation, but there's actually some cool logic to why these bars hold together so well without an oven.
- Fat Binding: The melted butter and peanut butter act as a glue. When they cool down, they solidify, locking the graham cracker crumbs into a dense, cohesive slab.
- Sugar Stabilization: Powdered sugar is much finer than granulated sugar. Because it's so small, it dissolves into the fats instantly, creating a smooth, velvety texture rather than a gritty one.
- Chocolate Tempering: Adding a bit of peanut butter to the chocolate chips doesn't just help the flavor. It changes the structure of the chocolate, making it softer and less likely to shatter into a million pieces when you slice it.
- Compression: Pressing the base firmly isn't just for looks. It removes air pockets, which prevents the bars from crumbling when you lift them out of the pan.
| Method | Time | Texture | Best For |
|---|---|---|---|
| No Bake (This Recipe) | 15 mins active | Fudgy & Dense | Quick prep, nostalgic taste |
| Baked Version | 45 mins total | Cakey & Toasty | Those who prefer a cookie like bite |
Right then, let's look at what's actually happening inside the ingredients. It's not just about taste, it's about how they play together to keep the bar from falling apart.
Component Analysis
| Ingredient | Science Role | Pro Secret |
|---|---|---|
| Graham Crumbs | Structural Base | Use a blender for a uniform "sand" texture |
| Creamy Peanut Butter | Primary Binder | Room temp PB mixes faster and smoother |
| Powdered Sugar | Sweetener/Stabilizer | Sift it first to avoid tiny white clumps |
| Semi Sweet Chips | Hardening Top | Use a high cocoa butter brand for a glossier look |
Gathering Your Essentials
For this recipe, you don't need anything fancy, but you do need the right versions of these items. Don't bother with low-fat peanut butter or margarine here - you'll lose that signature richness.
- Graham cracker crumbs (2 cups / 200g)Why this? Provides the necessary crunch and structure. Substitute: crushed digestive biscuits (slightly sweeter).
- Creamy peanut butter (1 cup / 250g for base)Why this? The main flavor and fat binder. Substitute: almond butter (adds a nuttier, less salty taste).
- Powdered sugar (1 cup / 120g)Why this? Ensures a smooth, non grainy base. Substitute: finely ground coconut sugar (will be denser and less sweet).
- Unsalted butter (½ cup / 115g, melted)Why this? Adds richness and helps the base set. Substitute: coconut oil (makes it slightly softer at room temp).
- Semi sweet chocolate chips (2 cups / 340g)Why this? Classic contrast to the salty base. Substitute: dark chocolate (for a more intense, less sweet top).
- Creamy peanut butter (¼ cup / 60g for topping)Why this? Prevents the chocolate from cracking. Substitute: cashew butter (creates a creamier finish).
Necessary Kitchen Tools
You can get away with a few basics, but a couple of things make this way easier. Honestly, don't try to do this without parchment paper. If you do, you'll be fighting the pan for an hour trying to get the bars out, and they'll likely break.
I recommend a 9x13 inch baking pan. If you use a smaller pan, your bars will be super thick, which is great, but you'll need to increase the chilling time. A microwave safe glass bowl is a must for the chocolate topping.
If you have a silicone spatula, use it - it's the only way to get that chocolate spread perfectly smooth to the very edges.
Making the Bars step-by-step

Let's crack on with the actual build. Pay attention to the smells and textures; that's how you know you're on the right track.
Phase 1: Constructing the Base
- Combine the crumbs and binders. Toss your graham cracker crumbs, 1 cup of creamy peanut butter, powdered sugar, and melted butter into a large bowl. Note: Melt the butter slowly so it doesn't boil.
- Mix until sandy. Stir everything together until the ingredients form a thick, sandy paste. It should smell like a nut butter factory and feel heavy in the bowl.
- Press into the pan. Dump the mixture into your parchment lined 9x13 inch pan. Use the back of a spoon or a flat spatula to press it down firmly until the top is completely level and packed tight.
- Initial chill. Pop the pan in the refrigerator for 30 minutes. This is critical; if the base is too warm, the chocolate topping will melt into it, and you'll lose those clean layers.
Phase 2: Creating the Glossy Topping
- Mix chocolate and PB. In your microwave safe bowl, combine the semi sweet chocolate chips and the remaining ¼ cup of peanut butter.
- Heat in bursts. Microwave for 20 seconds, then stir. Repeat this process until the mixture is a smooth, velvety liquid. You'll notice a rich cocoa aroma filling the air. Note: Be careful not to overheat, or the chocolate will seize and become grainy. According to Serious Eats, overheating chocolate can cause the cocoa butter to separate, leaving you with a lumpy mess.
- Pour and spread. Pour the melted chocolate over the chilled peanut butter base. Use your spatula to spread it evenly until it reaches every single corner of the pan.
Phase 3: Finishing and Setting
- The final set. Put the pan back in the refrigerator for at least 90 minutes. You want the chocolate to be firm and set to the touch.
- Release the block. Lift the parchment paper to pull the entire block out of the pan. This is the most satisfying part.
- Slice and serve. Use a sharp knife to cut the block into 24 equal squares. For the cleanest cuts, wipe the knife with a warm damp cloth between slices.
Pro Secrets and Common Pitfalls
One mistake I made early on was trying to rush the chilling process. I thought 20 minutes was enough, but the base was still slightly soft. When I poured the chocolate on, it actually sank into the base in some spots. Be patient with the fridge!
Another thing to watch is the peanut butter brand. If you use the "natural" kind that separates, make sure you stir it thoroughly before measuring. If there are oil pockets in your base, the bars will be greasy and won't hold their shape.
Why Your Base is Crumbling
If your bars fall apart the moment you touch them, you likely didn't press them hard enough into the pan. You want to almost "compact" the mixture. If it's already too late, you can't really fix it, but you can serve them in bowls as a dessert crumble.
Why Your Chocolate is Grainy
This usually happens if you microwaved the chocolate for too long without stirring. The chocolate "seizes" when it gets too hot. To prevent this, always go in short 20 second bursts.
| Problem | Root Cause | Solution |
|---|---|---|
| Base is too oily | Natural PB not stirred | Use commercial creamy PB |
| Chocolate cracked | Chilled too fast/no PB | Add ¼ cup PB to chocolate |
| Sticky edges | No parchment paper | Always line pan with parchment |
Common Mistakes Checklist:
- ✓ Did you press the base firmly? (Crucial for stability)
- ✓ Did you use powdered sugar instead of granulated? (Avoids grittiness)
- ✓ Did you chill the base before adding chocolate? (Prevents mixing layers)
- ✓ Did you stir the chocolate every 20 seconds? (Prevents seizing)
- ✓ Did you let the final set happen for a full 90 minutes? (Ensures clean cuts)
Fun Flavor Twists
If you want to deviate from the classic, there are a few ways to make these even more whimsical. I've found that adding a pinch of flaky sea salt on top of the chocolate right before it sets creates a gorgeous contrast.
For a bit of a crunch, you can mix in some crushed pretzels or toasted oats into the base. If you're looking for another peanut heavy treat, you might love my peanut butter cookies, which have a similar salty sweet profile but a softer, baked texture.
If you want to go the dairy-free route, you can use coconut oil instead of butter and dairy-free chocolate chips. It works surprisingly well, though the bars will be slightly softer at room temperature, so keep them in the fridge.
Adjusting the Batch Size
Sometimes 24 bars is just too many, or you're feeding a whole army. Here is how to handle the numbers.
Scaling Down (½ Batch): Use a 8x8 inch square pan instead of the 9x13. Everything in the ingredient list is easily halved. Since the layer is often thicker in a smaller pan, you might want to extend the final chilling time by about 20 minutes to ensure the center is set.
Scaling Up (2x Batch): I recommend working in batches rather than doubling the volume in one bowl, as mixing that much heavy paste can be a workout. If you're using a larger commercial sheet pan, keep the temperature the same but remember that the chocolate layer will take longer to cool.
Don't increase the salt or vanilla (if adding) to a full 2x; 1.5x is usually plenty to keep the flavor balanced.
Myths About No Bake Bars
There's a common idea that you need a food processor to get the graham cracker crumbs fine enough. Honestly, you don't. Just put the crackers in a Ziploc bag and whack them with a rolling pin. It's faster and honestly more therapeutic.
Another myth is that adding more powdered sugar makes the bars firmer. In reality, too much sugar can actually make the base "crumbly" and overly sweet, which masks the peanut butter flavor. Stick to the measurements; the butter and the chill time are what provide the strength, not the sugar.
Storage and Freezing Tips
These bars are basically shelf stable for a short time, but they are a million times better when cold. Store them in an airtight container in the fridge for up to 7 days. The chocolate stays snappy and the base stays dense.
For long term storage, these are absolute champions in the freezer. Wrap the individual bars in parchment paper and toss them in a freezer bag. They'll stay good for up to 3 months. I love eating them straight from the freezer - they turn into a sort of frozen fudge bar that's incredible on a hot day.
To avoid waste, if you have leftover graham crumbs, don't throw them away! They are perfect for making a quick crust for a cheesecake or mixing into a smoothie for a bit of texture.
The Best Pairing Ideas
Since these peanut butter lunch lady bars are so rich, you need something to cut through that density. A cold glass of skim or almond milk is the classic choice, but a strong, bitter black coffee is even better. The acidity of the coffee balances the sweetness of the chocolate perfectly.
If you're serving these as part of a larger dessert spread, pair them with something lighter, like a slice of classic pound cake served with fresh berries. The buttery, airy texture of the cake is a great contrast to the heavy, fudgy nature of the bars.
Right then, you're all set! These bars are proof that you don't need a fancy oven or a culinary degree to make something that tastes like a professional treat. Just remember the golden rule: don't skip the chill time, and press that base down like you mean it. Happy snacking!
Recipe FAQs
Can I keep these bars at room temperature?
No, store them in the fridge. While they are shelf stable for a short time, they are much better cold to ensure the chocolate stays snappy and the base remains dense.
Why is my chocolate layer too soft to slice?
You likely didn't chill them long enough. The bars must remain in the refrigerator for at least 90 minutes until the chocolate is completely set to the touch.
How to melt the chocolate without burning it?
Microwave in 20-second bursts. Stir between each interval until the chocolate chips and peanut butter form a smooth, velvety liquid.
Can I use crunchy peanut butter instead of creamy?
Yes, but the texture will be coarser. If you enjoy the salty sweet balance here, you'll appreciate the similar flavor profiling in our miso caramel sauce.
Is it true I must bake these bars to set the base?
No, this is a common misconception. These are no-bake bars that rely on 30 minutes of refrigeration to firm up the peanut butter and graham cracker mixture.
Can these bars be frozen for long term storage?
Yes, they freeze exceptionally well. Wrap individual bars in parchment paper and store them in a freezer bag for up to 3 months.
How to get clean, even cuts when slicing?
Lift the parchment paper out of the pan first. Remove the entire chilled block from the pan before slicing it into 24 equal squares with a sharp knife.
Peanut Butter Lunch Lady Bars

