Creamy Baked Cheesecake: Velvety and Crack-Free
- Time: Active 30 minutes, Passive 75 minutes, Total 105 minutes
- Flavor/Texture Hook: Silky smooth custard with a buttery, golden shatter crust
- Perfect for: Milestone celebrations or showing off at a dinner party
- How to Create a Perfect Cheesecake Recipe
- Why This Works
- Essential Recipe Specs and Timing
- The Elements of a Creamy Filling
- Necessary Equipment for a Smooth Finish
- Bringing the Whimsical Dessert Together
- Fixing Common Cheesecake Baking Obstacles
- Creative Flavor Variations and Twists
- Storage and Freshness Protection Tips
- Elegant Serving and Pairing Methods
- Myths About the Bake
- FAQ
- Troubleshooting Common Issues
- Recipe FAQs
- 📝 Recipe Card
How to Create a Perfect Cheesecake Recipe
The scent of toasted graham crackers warm, honeyed, and deeply nostalgic wafting through the kitchen is my "all is right with the world" signal. I remember the first time I pulled a tray of these out and the surface was as smooth as a mirror, glowing under the oven light.
It wasn't always that way; my early attempts often ended up looking like a topographical map of the Grand Canyon, with deep cracks that I tried to hide under mountains of whipped cream.
We are going for that specific, iconic texture: a dense, velvety crumb that yields to the fork like softened butter but holds its sharp, clean edge when sliced. This isn't just a dessert; it’s a whimsical treat that anchors a table.
We’re going to focus on the sensory cues the way the batter should look like heavy satin and the subtle "jiggle" that tells you it’s finished.
By the time we're done, you'll understand why we treat cream cheese like a delicate porcelain and why the water bath is your best friend. This homemade cheesecake recipe is designed to be approachable but result oriented, focusing on the small mechanical wins that lead to a professional finish.
Trust me, once you hear that first "shatter" of the crust under your knife, you’ll never go back to store-bought.
Why This Works
- Thermal Buffering: The water bath surrounds the pan with a constant 212°F environment, preventing the eggs from curdling or the edges from overcooking.
- Starch Free Emulsion: By relying on high fat sour cream and eggs rather than flour, we achieve a more luxurious, melting mouthfeel.
- Latent Heat Control: Turning off the oven and cracking the door allows the internal temperature to stabilize slowly, which prevents the protein structure from shrinking too fast and cracking the surface.
- Aeration Prevention: Using the paddle attachment on low speed ensures we don't whip air into the batter, which is the primary cause of unsightly surface bubbles and "souffléing."
| Cook Method | Time | Texture | Best For |
|---|---|---|---|
| Traditional Oven | 75 minutes | Denser, creamy, uniform | Classic New York style |
| Stovetop (Steam) | 50 minutes | Lighter, almost mousse like | Small batches/Summer baking |
| Pressure Cooker | 35 minutes | Ultra moist, very soft | Quick fixes/No oven days |
Choosing the right method depends on your desired density. For this classic philadelphia cheesecake recipe, the oven method provides that essential slow bake that develops the deep, custard like flavors we love.
The stovetop method is a great alternative if you are worried about oven hot spots, but it often lacks that subtle golden hue on the edges.
Essential Recipe Specs and Timing
To get the best homemade cheesecake from scratch, we have to be disciplined with our clock and our thermometer. This isn't a "wing it" kind of bake. Precision is what separates a grainy cake from a silky one.
| Component | Science Role | Pro Secret |
|---|---|---|
| Cream Cheese | Structural base | Must be "dead" room temp to avoid tiny white lumps. |
| Eggs | Binding agent | Add them last to keep the structure dense rather than airy. |
| Sour Cream | Acidic tenderizer | Breaks down the "heavy" fat for a brighter, cleaner finish. |
| Lemon Juice | pH Balancer | Chemically tightens the proteins for a better set. |
The interaction between the acid in the lemon and the fat in the cream cheese is fascinating. It doesn't just add a zing; it actually helps the proteins in the eggs and cheese knit together more tightly. This creates that "clean" break when you take a bite, rather than a sticky or gummy residue.
The Elements of a Creamy Filling
For the best easy cheesecake recipe, we need to be picky about our materials. Using full fat versions of everything is non negotiable here. low-fat substitutes carry too much water and not enough stabilizer, which will leave you with a weeping, soggy mess.
- 1.5 cups (150g) graham cracker crumbs Why this? Provides the classic honey wheat base notes.
- 5 tbsp (70g) unsalted butter, melted Why this? Acts as the glue for the crust.
- 2 tbsp granulated sugar Why this? Encourages caramelization during the pre bake.
- 0.25 tsp sea salt Why this? Sharpens the sweetness of the filling.
- 32 oz (900g) full fat brick style cream cheese, room temperature Why this? The high fat content ensures a velvety mouthfeel.
- 1 cup (200g) granulated sugar Why this? Provides sweetness and helps soften the cheese.
- 1 cup (240g) full fat sour cream, room temperature Why this? Adds moisture and a necessary tangy counterpoint.
- 1 tbsp pure vanilla extract Why this? The aromatic backbone of the entire dessert.
- 2 tsp fresh lemon juice Why this? Cuts through the richness of the fats.
- 4 large eggs, room temperature Why this? The structural glue that sets the custard.
| Original Ingredient | Substitute | Why It Works |
|---|---|---|
| Graham Crumbs | Digestive Biscuits | Similar texture but slightly less sweet. |
| Sour Cream | Full fat Greek Yogurt | Adds a sharper tang; ensure it is well strained. |
| Granulated Sugar | Light Brown Sugar | Adds a molasses note. Note: Will darken the filling. |
If you find yourself out of standard crumbs, I've even seen people use crushed ginger snaps for a spicy kick. If you're looking for a different vibe entirely, you might enjoy exploring a Loaf Pan Basque Cheesecake which skips the crust altogether for a burnt, caramelized top.
Necessary Equipment for a Smooth Finish
You don't need a lab, but a few specific tools make this creamy baked cheesecake recipe much easier to manage. A 9 inch springform pan is the gold standard because it allows you to release the cake without flipping it a move that would be disastrous for a delicate custard.
I highly recommend a stand mixer with a paddle attachment. The whisk attachment is the enemy here; it incorporates too much air. If you only have a hand mixer, use the lowest setting and be patient. You'll also need heavy duty aluminum foil.
Standard foil is often too thin and prone to tiny pinhole tears, which will allow the water bath to seep in and turn your crust into a soggy sponge.
Chef's Tip: Before you start mixing, run your mixing bowl under hot water and dry it thoroughly. A warm bowl helps the cream cheese stay soft and emulsify faster with the sugar.
Bringing the Whimsical Dessert Together
- Preheat your oven to 350°F. Mix the graham cracker crumbs, melted butter, 2 tbsp sugar, and salt until it feels like wet sand. Smell Check: You should notice a warm, nutty aroma as the butter hits the crumbs.
- Press the mixture firmly into the bottom and 1 inch up the sides of a 9 inch springform pan. Note: Use the bottom of a flat measuring cup to get a perfectly even layer.
- Bake for 10 minutes until golden and fragrant, then let cool completely on a wire rack.
- Reduce oven heat to 325°F. Using a stand mixer with a paddle attachment, beat the room temperature cream cheese and 1 cup sugar on medium low speed until completely smooth, approximately 2 minutes, scraping the bowl frequently.
- Add the sour cream, vanilla extract, and lemon juice. Mix on low speed until the batter looks like liquid silk.
- Add the eggs one at a time, mixing on low speed only until the yellow disappears. Note: This prevents over aerating the proteins.
- Wrap the outside of the cooled springform pan in three layers of heavy duty aluminum foil.
- Place the pan in a large roasting tray and pour boiling water into the tray until it reaches halfway up the sides of the pan.
- Bake in the center of the oven for 75 minutes until the edges are set but the center still jiggles like Jell O.
- Turn off the oven, crack the door, and let cool gradually in the oven for 60 minutes before chilling for at least 7 hours. Smell Check: The kitchen should smell like a sweet, toasted vanilla custard.
1. The Low Air Principle
The biggest mistake people make is beating the batter like they're making a sponge cake. In a cheesecake, air is a disruptor. When air bubbles trapped in the batter heat up, they expand, causing the cake to rise.
Since the cake has no flour structure to hold that rise, it inevitably collapses, leading to those dreaded cracks. Keep that mixer speed low!
2. The Thermal Buffer
The water bath, or bain marie, acts as an insurance policy. Water cannot exceed 212°F at sea level, so it creates a protective jacket around your pan. This ensures the eggs cook into a creamy custard rather than a rubbery scramble.
It also provides a humid environment which keeps the surface of the cake from drying out and splitting.
3. The Controlled Cool
Temperature shocks are the enemy of a homemade cheesecake. When you move a hot cake directly to a cold counter, the rapid contraction of the fats and proteins pulls the cake away from the edges too quickly. By letting it sit in the cooling oven, you allow the structure to "relax" into its final shape gradually.
Fixing Common Cheesecake Baking Obstacles

Sometimes, despite our best efforts, things go sideways. The good news is that most "failures" are still completely edible and often fixable with a little creative dessert magic.
Why Your Cheesecake Surface Cracked
Cracks usually happen for two reasons: overbaking or a lack of moisture. If the internal temperature gets too high, the egg proteins tighten up and pull the surface apart. Alternatively, if the cake sticks to the side of the pan as it cools and shrinks, it will pull from the center and split.
Always run a thin knife around the edge after the initial cooling period to prevent this.
| Problem | Root Cause | Solution |
|---|---|---|
| Lumpy Batter | Cold cream cheese | Microwave cheese in 10s bursts or use a warm bowl. |
| Soggy Crust | Water bath leak | Use a slow cooker liner or more foil layers. |
| Gummy Texture | Underbaked | Check for the "jiggle" only the center 2 inches should move. |
Common Mistakes Checklist
- ✓ Room Temp Everything: Eggs, cheese, and sour cream must be at room temperature to emulsify properly.
- ✓ Don't Overbeat: Stop the mixer as soon as the egg yolks disappear to avoid trapped air.
- ✓ Boiling Water: Always use boiling water for the bath; cold water will drop the oven temp significantly.
- ✓ Patience is Key: Never slice a cheesecake that hasn't chilled for at least 7 hours; the structure needs time to fully set.
Creative Flavor Variations and Twists
Once you've mastered the classic, you can start exploring unique sweet flavors. The base is quite forgiving, allowing you to fold in swirls or change the crust entirely. If you want a more airy, sponge like experience, you might want to look into a Japanese Castella Cake which uses a completely different aeration technique.
1. The Berry Swirl
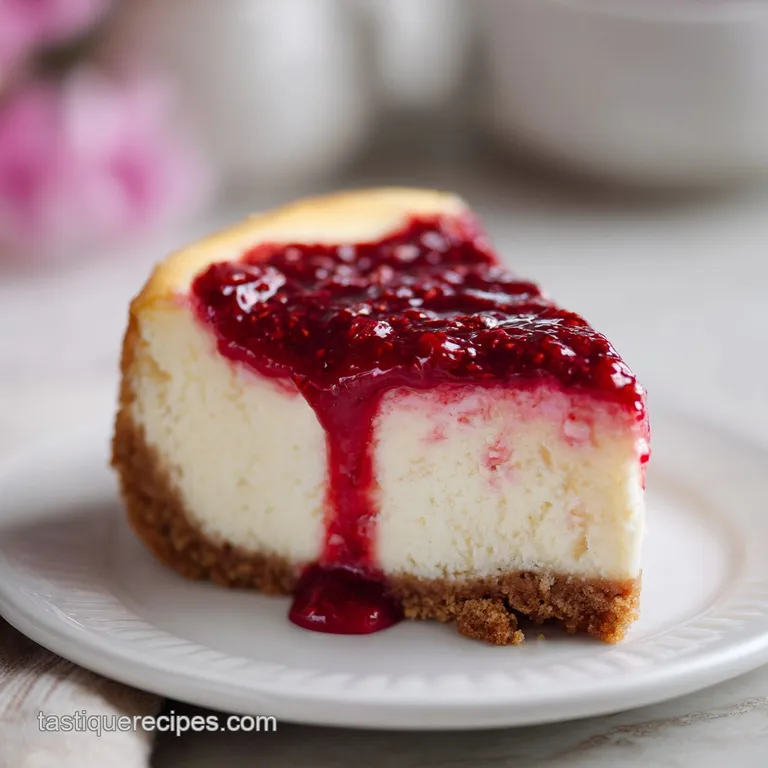
To add a fruit element, reduce 1 cup of raspberries with a tablespoon of sugar until thick. Drop small spoonfuls onto the raw batter and use a toothpick to create whimsical swirls. This adds a sharp, acidic contrast to the heavy cream cheese.
2. The Turtle Variation
For a decadent twist, top the finished, chilled cake with toasted pecans, a drizzle of salted caramel, and melted dark chocolate. The salt in the caramel will pull out the hidden floral notes in the vanilla extract.
| Feature | Premium Version | Budget Version | Savings |
|---|---|---|---|
| Vanilla | Fresh Vanilla Bean | Imitation Extract | $5.00 |
| Crust | Macadamia Nuts | Graham Crumbs | $8.00 |
| Cream Cheese | Organic Grass fed | Store Brand | $4.00 |
Storage and Freshness Protection Tips
Cheesecake is the ultimate make-ahead dessert because the flavor actually improves after 24 hours in the fridge. The fats have time to meld, and the sweetness mellows out into something much more complex.
Storage: Keep the cake in the springform pan (wrapped in plastic) or move it to an airtight container. It will stay fresh in the fridge for up to 5 days.
Freezing: This is one of the best desserts for freezing. Wrap individual slices tightly in plastic wrap, then a layer of foil. They will last for 2 months. To eat, thaw in the fridge overnight. Never microwave a frozen slice, or the emulsion will break and turn oily.
Zero Waste: If you have leftover crust crumbs, save them! They make a brilliant topping for yogurt or oatmeal. If a cake does crack badly, don't toss it scoop it into balls, freeze them, and dip them in melted chocolate to make "cheesecake truffles."
Elegant Serving and Pairing Methods
When it comes to serving, a clean slice is everything. Dip a long, thin knife into a tall glass of hot water, wipe it dry, and make your first cut. Repeat the dipping and wiping for every single slice. This ensures that the velvety interior doesn't smudge across the face of the cake.
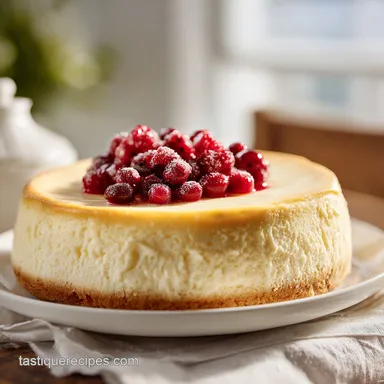
- Fresh Floral Notes: Garnish with edible flowers like Sampaguita for a whimsical, aromatic touch that complements the lemon juice.
- Fruit Coulees: A simple mango or passionfruit reduction provides a tropical brightness that cuts through the 487 calories of richness.
- Coffee Pairing: Serve with a dark, bitter espresso. The tannins in the coffee provide a perfect "palate reset" between bites of the sweet, fatty cake.
If you are serving a crowd, consider different textures. A quick and simple cheesecake recipe like this one pairs beautifully with something light and airy, like Perfect Vanilla Cupcakes.
Myths About the Bake
Many people believe that a cracked cheesecake is "ruined." In reality, a crack is just a cosmetic issue. It doesn't affect the flavor or the safety of the cake. Just cover it with fruit or ganache and carry on!
Another common myth is that you must use a water bath. While you can bake without one by using very low heat (around 250°F) for a longer time, the water bath is much more reliable for home ovens that tend to cycle their heating elements on and off.
The water bath provides a steady, unwavering heat source that a dry oven simply can't match.
Finally,, some say you should beat the cheese for 10 minutes to make it "light." Don't do it! Over beating the cheese releases too much oil and incorporates air, leading to a greasy, bubbly cake. Two minutes is all you need for a smooth, homogenous base.
FAQ
Troubleshooting Common Issues
| Issue | Solution |
|---|---|
| Use a different size pan | You can use a 10 inch springform pan, but the cake will be thinner. Reduce the bake time by about 10-15 minutes. For an 8 inch pan, the cake will be very tall and may require an extra 10-20 minutes of |
| Crust soggy even though I used foil | Even heavy duty foil can have microscopic tears. For a 100% waterproof seal, many pros now use a silicone cake pan protector or a slow cooker liner bag stretched over the bottom of the pan before wrap |
| Do I really need to let it sit in the oven after it's done | Yes. This is the most critical step for preventing cracks. The gradual cooling allows the internal structure to set without the stress of a rapid temperature drop. Skipping this almost guarantees a sp |
| Substitute granulated sugar for honey | I don't recommend it for the main filling. Honey is a liquid sweetener and will change the hydration of the batter, potentially preventing it from setting properly. It also browns much faster, which c |
| Know if my eggs are actually at room temperature | If you forgot to take them out, place the whole eggs in a bowl of warm (not hot) water for 5-10 minutes. This will bring them to the correct temperature quickly without cooking them. |
| What should I do if the water bath leaks | If you pull the cake out and notice the bottom is wet, don't panic. Remove the foil immediately and let the cake sit on a wire rack. Sometimes the crust will "re crisp" as it cools, though it may be s |

Recipe FAQs
What is the secret to making good cheesecake?
Room temperature ingredients are the secret. Using room temperature cream cheese, sour cream, and eggs ensures the batter emulsifies into a smooth, lump free consistency without needing to overmix.
What are the ingredients in 3 ingredient cheesecake?
This recipe does not use a 3-ingredient method. To achieve the proper professional texture, you must use the full list of ingredients including cream cheese, sugar, sour cream, vanilla, lemon juice, eggs, graham cracker crumbs, butter, and salt.
What are the ingredients of cheesecake?
The essential components are a crust and a filling. The crust uses 1.5 cups graham cracker crumbs, 5 tbsp melted butter, 2 tbsp sugar, and 0.25 tsp sea salt; the filling requires 32 oz cream cheese, 1 cup sugar, 1 cup sour cream, 1 tbsp vanilla, 2 tsp lemon juice, and 4 large eggs.
Is cheesecake good for heart patients?
No, it is a high calorie dessert. With 487 calories per serving, this dish contains significant amounts of saturated fat from the full fat cream cheese, butter, and sour cream.
How to prevent the center from cracking?
Use a water bath and avoid overmixing. By placing the pan in a roasting tray with boiling water, you provide gentle, even heat, while mixing only until the eggs disappear prevents excess air from causing the structure to collapse.
How to tell if the cheesecake is done baking?
Look for set edges and a slight jiggle in the center. If you enjoyed mastering this delicate texture control here, apply the same observational approach to check for doneness before turning off the oven and letting it cool gradually.
How to store leftover cheesecake?
Keep it in an airtight container in the refrigerator for up to 5 days. The flavor profile actually improves after 24 hours as the fats meld together, making it an ideal make-ahead dessert.
Creamy Baked Cheesecake
Ingredients:
Instructions:
Nutrition Facts:
| Calories | 487 calories |
|---|---|
| Protein | 8 grams |
| Fat | 37 grams |
| Carbs | 33 grams |
| Fiber | 1 gram |
| Sugar | 24 grams |
| Sodium | 290 milligrams |
