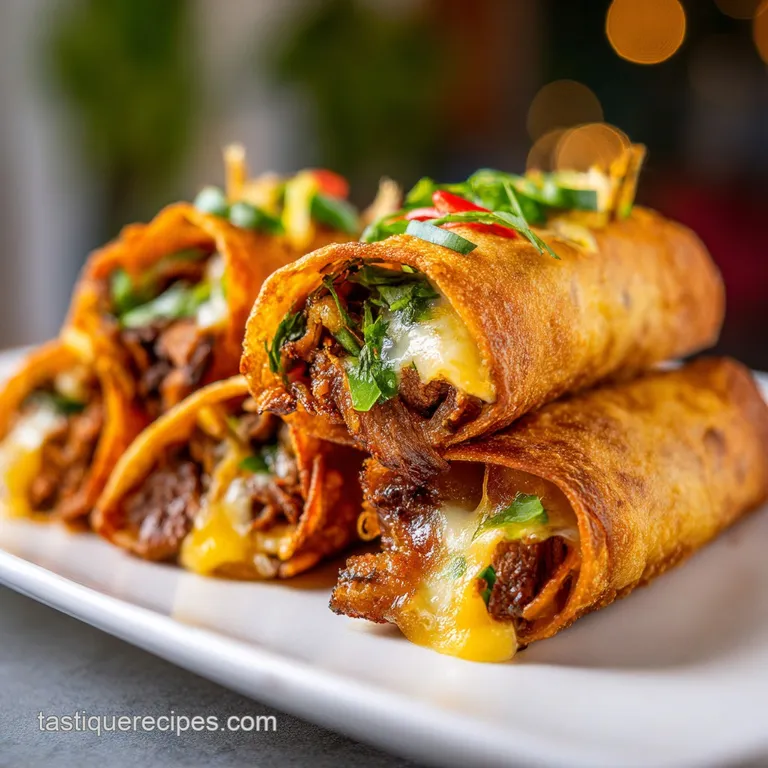
Beef and Cheese Chimichangas: Crispy and Golden
- Time: 20 min active + 20 min cook = Total 40 minutes
- Flavor/Texture Hook: Shatter crisp golden shell with a velvety, molten cheese center
- Perfect for: Family taco night or a comforting weekend dinner
- Best beef and cheese chimichangas recipe
- Getting the crunch right
- Component Analysis
- The must have ingredients
- Your kitchen gear
- The cooking process
- Fixing common mistakes
- Troubleshooting Common Issues
- Twists and swaps
- Adjusting the batch size
- Truths about frying
- Storage and freezing
- Plating your feast
- Recipe FAQs
- 📝 Recipe Card
Best beef and cheese chimichangas recipe
That first hiss when the rolled tortilla hits the shimmering oil is a sound I can't get enough of. I remember the first time I tried making these for a group of friends. I was overconfident and skipped the step of simmering the beef broth down, thinking "it's just a little liquid, it'll be fine." It was not fine.
The moisture leaked through the flour, the tortillas became oil logged, and instead of a crisp shell, I served something that felt like a wet sponge.
Since then, I've learned that the magic of a beef and cheese chimichangas recipe isn't in the frying itself, but in the prep. You need that sharp contrast between the rigid, golden exterior and the rich, savory interior. Once you nail the moisture balance, these things become a staple.
It's all about bridging that gap between a standard soft taco and a deep fried delicacy, bringing a restaurant quality crunch right into a home kitchen without needing professional equipment.
This recipe focuses on that exact balance. We're looking for a beef filling that's savory and bold but not "soupy," paired with a cheese that melts into a velvety river. Whether you're a seasoned pro or this is your first time frying something, the steps here are designed to stop the leaks and maximize the crunch.
Trust me, once you hear that shell crack, you'll never go back to just baking them.
Getting the crunch right
If you've ever wondered why some chimichangas are oily and others are light and crisp, it comes down to a few simple things. It's not about the amount of oil, but how that oil interacts with the flour tortilla.
The Dry Fill Rule: Moisture is the enemy of a crisp shell. By simmering the beef broth until it's completely gone, we ensure the tortilla doesn't steam from the inside out, which would make it limp.
Tortilla Pliability: Warming the tortillas for a few seconds makes the gluten relax. This prevents the dreaded "tear" when you're rolling, which is usually how the cheese leaks out into the oil.
Oil Temperature: Frying at exactly 350°F ensures the outside sears quickly. If the oil is too cool, the tortilla just absorbs the fat like a sponge.
The Seam Seal: Placing the chimichanga seam side down first "welds" the tortilla shut. This creates a structural seal that keeps the velvety cheese locked inside.
| Method | Time | Texture | Best For |
|---|---|---|---|
| Deep Fry | 20 mins | Shatter crisp | Maximum indulgence |
| Air Fry | 15 mins | Golden crunchy | Healthier option |
| Oven Bake | 25 mins | Firm crisp | Large batches |
I've found that while the oven is easier for a crowd, it lacks that specific "snap" you get from the skillet. If you're looking for other comforting meals that hit that same savory spot, you might love my Dolly Parton Casserole for a different kind of cozy vibe.
Component Analysis
When you're building a beef and cheese chimichangas recipe, every ingredient has a specific job. It's not just about flavor, but about how the components hold up under high heat.
| Ingredient | Science Role | Pro Secret |
|---|---|---|
| Ground Beef | Protein Base | Use 80/20 fat ratio for better flavor carry |
| Flour Tortilla | Structural Shell | Warm it slightly to prevent cracking |
| Beef Broth | Flavor Concentrator | Simmer until dry to avoid soggy shells |
| Vegetable Oil | Heat Transfer | Keep at 350°F for a non greasy finish |
The choice of vegetable oil is key here because it has a high smoke point. Using something like extra virgin olive oil for the frying part would result in a burnt taste and a lot of smoke in your kitchen.
The must have ingredients
Here is everything you'll need. I've kept this simple, but the quality of your cheese really makes the difference in the final texture.
- 1 lb ground beef Why this? Provides the savory, hearty base (Substitute: Ground turkey for a leaner option)
- 1 small yellow onion, finely diced Why this? Adds aromatic depth (Substitute: Shallots for a milder taste)
- 3 cloves garlic, minced Why this? Essential punchy flavor (Substitute: 1 tsp garlic powder)
- 1 tbsp olive oil Why this? For sautéing the aromatics (Substitute: Butter for richness)
- 1 tbsp chili powder Why this? Classic Tex Mex warmth (Substitute: Ancho chili powder for smokiness)
- 1 tsp ground cumin Why this? Earthy, nutty undertones (Substitute: Coriander for a citrusy note)
- 1/2 tsp smoked paprika Why this? Mimics a grilled flavor (Substitute: Sweet paprika)
- 1/2 tsp salt Why this? Enhances all other spices
- 1/4 tsp black pepper Why this? Subtle heat
- 1/4 cup beef broth Why this? Deglazes the pan and binds spices (Substitute: Water or beef stock)
- 8 large flour tortillas Why this? Best for folding and frying (Substitute: Corn tortillas, but they tear easier)
- 2 cups shredded Mexican blend cheese Why this? Melts into a velvety consistency (Substitute: Monterey Jack or Pepper Jack)
- 2 cups vegetable oil Why this? High smoke point for frying (Substitute: Canola or Peanut oil)
Your kitchen gear
You don't need a professional kitchen for this, but a few tools make the process way smoother. A heavy bottomed skillet is my favorite because it holds the oil temperature more consistently than a thin pan.
I highly recommend using a digital thermometer for the oil. Guessing the temperature is how most people end up with greasy chimichangas. If you don't have one, you can drop a small piece of tortilla into the oil; if it sizzles immediately and rises to the top, you're usually in the ballpark of 350°F.
A slotted spoon or tongs are essential for removing the chimichangas without burning your fingers. Also, have a plate lined with paper towels ready to go. This step is non negotiable if you want that clean, crisp finish.
The cooking process
Let's get into it. Follow these steps closely, especially the part about the beef broth, to ensure your beef and cheese chimichangas recipe turns out exactly how it should.
Phase 1: Searing the Filling
- Heat 1 tbsp olive oil in a skillet over medium high heat. Add diced onion and cook until translucent and fragrant, about 3 minutes.
- Add the ground beef to the skillet, breaking it apart with a spatula. Cook until the meat is browned and no pink remains.
- Stir in the minced garlic, chili powder, cumin, paprika, salt, and pepper. Note: Toasting the spices with the meat for a minute unlocks more flavor.
- Pour in the beef broth. Simmer for 3-5 minutes until the liquid has completely evaporated. This is the most important part for a crisp shell. Remove from heat and let cool slightly.
Phase 2: The Roll and Seal
- Quickly warm the tortillas in a dry pan for 10 seconds per side. Note: This makes them pliable and prevents tearing.
- Place approximately 1/3 cup of the beef mixture in the center of each tortilla.
- Top the beef with a portion of shredded cheese (approximately 1/4 cup per tortilla), fold in the sides, and roll tightly to seal.
Phase 3: Achieving the Gold Standard
- Heat vegetable oil in a skillet to 350°F (175°C). Place chimichangas seam side down in the oil and fry until golden brown on all sides.
- Transfer to a paper towel lined plate to drain excess oil before serving.
Chef's Tip: To get an even more intense flavor, add a pinch of espresso powder to your beef mixture. It doesn't make it taste like coffee, but it deepens the savory notes of the beef and chili powder.
Fixing common mistakes

Even with a great beef and cheese chimichangas recipe, things can go sideways. Usually, it's a matter of temperature or moisture.
Troubleshooting Common Issues
| Issue | Solution |
|---|---|
| Why Your Chimichanga Is Greasy | This is almost always caused by the oil temperature dropping. When you add the tortillas, the oil cools down. If it dips too far below 350°F, the tortilla absorbs the oil instead of searing. Give the |
| Why Your Tortilla Tore | If the tortillas are cold, they're brittle. Flour tortillas contain gluten that needs a little heat to become stretchy. If you skip the 10 second warming step, the tortilla will likely split right as |
| Why the Cheese Leaked | This happens if you overfill the tortilla or don't tuck the sides tightly. The cheese expands as it melts, and if there's a gap, it'll find its way out, creating those little fried cheese "crisps" in |
Common Mistakes Checklist:
- ✓ Did I simmer the beef broth until the pan was dry?
- ✓ Did I warm the tortillas before filling?
- ✓ Is my oil exactly at 350°F?
- ✓ Did I place them seam side down first?
- ✓ Did I drain them on paper towels?
Twists and swaps
Depending on what you have in the pantry, you can easily tweak this beef and cheese chimichangas recipe.
The Air Fryer Twist
If you want to avoid the deep fryer, you can use an air fryer. Brush the rolled chimichangas generously with melted butter or oil. Air fry at 400°F (200°C) for 8-10 minutes, flipping halfway through, until the shell is golden.
It's not quite as shatter crisp as frying, but it's a great alternative.
The Spicy Heat Swap
For those who love a kick, replace the smoked paprika with chipotle powder or add minced jalapeños to the onion sauté. According to Serious Eats, using different types of dried chilies can completely shift the flavor profile from earthy to bright.
The "Fiesta" Addition
To make these heartier, stir in a half cup of cooked black beans or corn into the beef mixture. Just make sure the beans are well drained so you don't introduce more moisture into the filling.
The Low Carb Alternative
While you can't fry a low carb tortilla with the same results, you can use almond flour tortillas and bake them. Be aware that almond flour tortillas are more fragile, so don't overfill them and avoid the deep fryer entirely.
| Original Ingredient | Substitute | Why It Works |
|---|---|---|
| Ground Beef (1 lb) | Ground Turkey (1 lb) | Similar texture. Note: Leaner, so add 1 tbsp extra oil |
| Mexican Blend Cheese | Pepper Jack (2 cups) | Similar melting point. Note: Adds a spicy kick |
| Beef Broth (1/4 cup) | Vegetable Broth (1/4 cup) | Similar liquid properties. Note: Lighter beef flavor |
If you're serving these as part of a bigger meal, I highly recommend pairing them with my Crack Green Beans for a salty, crunchy side that cuts through the richness of the cheese.
Adjusting the batch size
Scaling a beef and cheese chimichangas recipe is pretty straightforward, but you can't just multiply everything blindly, especially when it comes to the oil and spices.
Cutting it in half: If you're just cooking for two, use 1/2 lb of beef. Reduce the oil for frying to about 1 cup, depending on your pan size. You'll likely need about 10% less time to brown the meat since there's less volume in the pan.
Doubling the recipe: When making 16 chimichangas, don't double the spices exactly. Start with 1.5x the chili powder and cumin, then taste. Spices can become overwhelming in larger batches. Most importantly, work in small batches for frying.
If you crowd the pan, the oil temperature will plummet, and you'll end up with the grease soak effect.
Baking in bulk: If you're doing a huge party, I suggest the oven method. Lay them on a baking sheet, brush with oil, and bake at 375°F (190°C) for 20 minutes. Lower the temperature slightly if you notice the edges browning too fast.
Truths about frying
There are a few things people get wrong about this dish that can make you hesitant to try it.
The "Sealing" Myth: You'll often hear that searing the meat "seals in the juices." This isn't actually how it works. Moisture escapes regardless of the sear. The browning of the beef is actually about creating deep, savory flavor through the breakdown of proteins, which makes the filling taste much richer.
The "Healthy" Oil Myth: Some people think using "healthy" oils like extra virgin olive oil is better for frying. In reality, the high heat of frying destroys the delicate compounds in EVOO and can make it taste bitter. Stick to neutral oils with high smoke points for a cleaner taste.
The "More Cheese is Better" Myth: While we all love cheese, overfilling the chimichanga leads to structural failure. Too much cheese creates a steam pocket that can actually make the tortilla soggy from the inside or cause it to burst. Stick to the 1/4 cup guideline for the best results.
Storage and freezing
Since this is a beef and cheese chimichangas recipe, you'll often have leftovers. The challenge is keeping that crunch.
Fridge Storage: Store cooked chimichangas in an airtight container for up to 3 days. To reheat, avoid the microwave at all costs it will make them rubbery.
Use a toaster oven or an air fryer at 350°F (175°C) for 5 minutes until they crisp up again.
Freezer Friendly: You can freeze these before frying. Roll them up, wrap them individually in parchment paper, and place them in a freezer bag for up to 2 months.
When you're ready, fry them straight from frozen, but lower the oil temperature to 325°F (160°C) and fry them for a few minutes longer to ensure the center is hot.
Zero Waste Tips: Don't throw away the onion ends or garlic peels. I usually toss them into a freezer bag to make a scrap broth later. If you have leftover beef filling, it makes a fantastic base for a quick taco bowl or a topping for a baked potato the next day.
Plating your feast
The way you serve these can change the whole experience. I love playing with the contrast of the hot, crisp shell and cold, bright toppings.
The Classic Platter
Line a large platter with shredded lettuce. Place the chimichangas on top and drizzle with a mixture of sour cream and lime juice. Add a side of chunky salsa and sliced avocado. The coolness of the avocado balances the richness of the fried shell.
The "Wet" Style
If you want something more indulgent, turn these into "wet" chimichangas. Place the fried rolls on a plate and smother them in warm enchilada sauce and extra melted cheese. Pop them under the broiler for 2 minutes. This creates a wonderful contrast between the crispy edges and the velvety sauce.
Final Touch
Garnish with fresh cilantro and a squeeze of lime. The acidity of the lime is crucial it cuts through the fat of the oil and cheese, brightening the whole dish. It's the difference between a meal that feels "heavy" and one that feels balanced.
Recipe FAQs
How to prevent the tortillas from tearing during rolling?
Warm them in a dry pan for 10 seconds per side. This makes the gluten stretchy and pliable, preventing brittle flour tortillas from splitting.
Why are my chimichangas too greasy?
The frying oil temperature dropped below 350°F. When the oil is too cool, the tortilla absorbs the fat instead of searing immediately.
How to reheat leftover chimichangas while keeping them crunchy?
Use a toaster oven or air fryer at 350°F for 5 minutes. Avoid the microwave, as it turns the crispy exterior rubbery.
Is it true that you should freeze chimichangas after frying?
No, this is a common misconception. Freeze them before frying by wrapping them in parchment paper to maintain the best texture.
How to stop the cheese from leaking out during frying?
Avoid overfilling the tortillas. Stick to approximately 1/4 cup of cheese and fold the sides tightly to create a secure seal.
Can I use a different method to cook the beef filling?
Yes, a slow cooker works well for the beef base. If you prefer a slower simmer, the same browning principles used in our slow cooker beef recipe can be applied here.
How to make sure the filling isn't too moist?
Simmer the beef broth for 3-5 minutes until completely evaporated. This prevents excess liquid from steaming the tortilla from the inside out.
Beef And Cheese Chimichangas