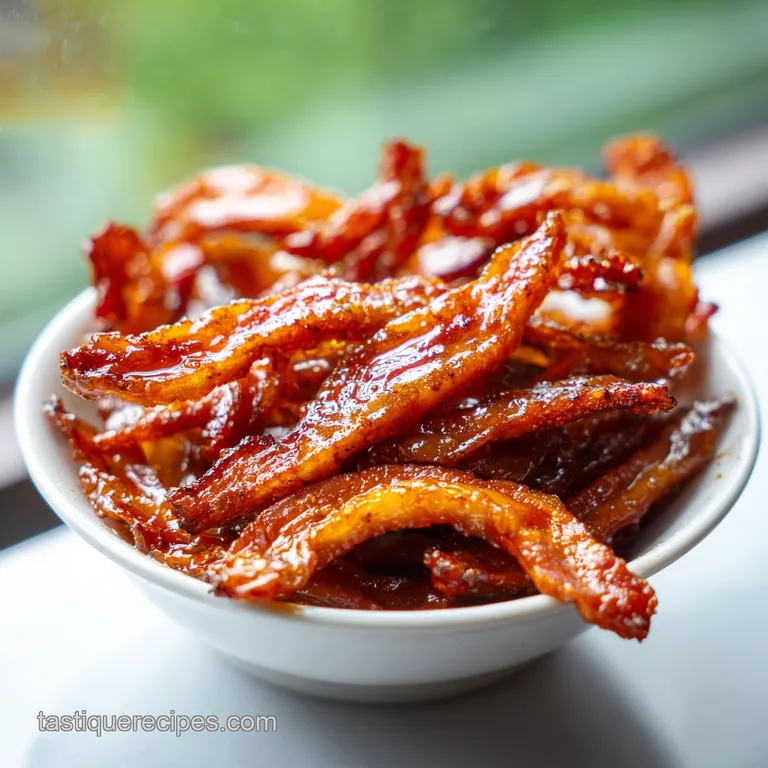
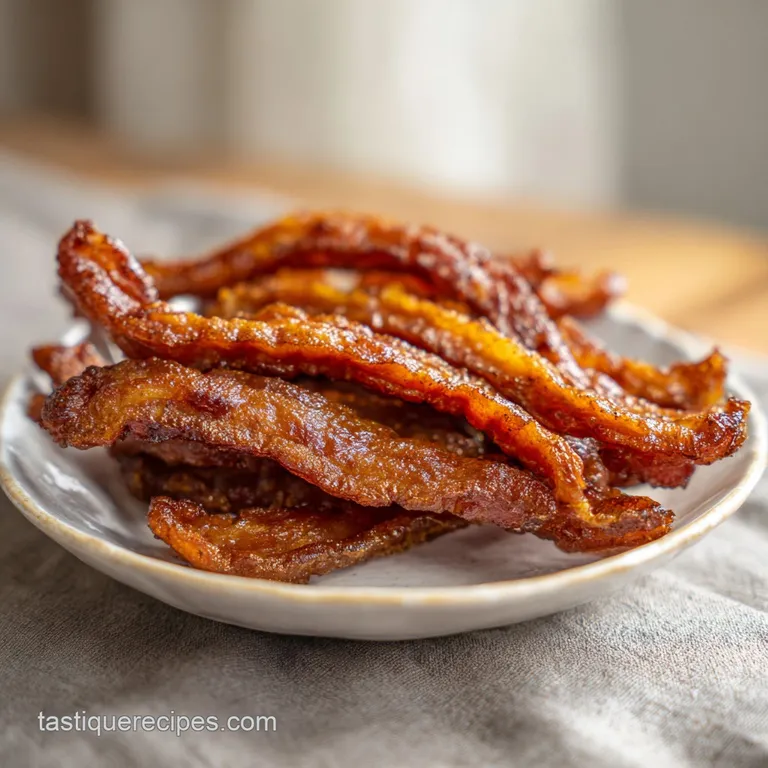
Vegan Soy Curl Bacon: Smoky & Crispy
- Time: Active 10 minutes, Passive 10 minutes, Total 20 minutes
- Flavor/Texture Hook: Smoky, salty, and shatters with a satisfying crispness
- Perfect for: High protein meal prep, weekend brunches, or topping a hearty salad
- How to Achieve the Crispiest Texture for Vegan Soy Curl Bacon
- The Physics of the Fiber Snap
- Deep Dive into Component Analysis
- Selecting Your Pantry Essentials
- Necessary Tools for Success
- Step-by-Step Preparation and Execution
- Avoiding Common Kitchen Disasters
- Creative Flavor Variations to Try
- Keeping Your Bacon Fresh
- Serving and Pairing Suggestions
- Debunking Plant Based Myths
- Recipe FAQs
- 📝 Recipe Card
How to Achieve the Crispiest Texture for Vegan Soy Curl Bacon
The first time I dropped a batch of marinated soy curls into a screaming hot cast iron skillet, the sound was like a round of applause. That rhythmic sizzle filled my kitchen, followed immediately by the heady, nostalgic aroma of woodsmoke and maple syrup.
I remember watching the pale, spongy curls transform into deep mahogany ribbons, their edges curling and darkening until they looked exactly like the strips my grandmother used to fry up on Sunday mornings. It was a revelation for my plant based journey.
I used to struggle with vegan bacon that felt like wet cardboard or flavorless strips of rubber. But when you get this right, the texture is incredible. It’s about that specific moment when the sugars in the maple syrup hit the heat and fuse with the soy protein, creating a crust that actually snaps when you bite into it.
You don't need expensive store-bought substitutes when you have a bag of curls and a few pantry staples.
This recipe isn't just about feeding yourself; it's about the joy of a high protein meal that doesn't compromise on that "salty crunchy" craving. We’re going to walk through the prep flow together, from the initial soak to that final, perfect sear.
Whether you're stuffing these into a BLT or crumbling them over a bowl of soup, this technique is going to become your new kitchen standard. Trust me, once you hear that first "shatter" of a crisp curl, you'll never go back to the boxed stuff.
The Physics of the Fiber Snap
The Secret to the Shatter: Dehydrated soy curls act like microscopic sponges that require full capillary saturation to soften, followed by rapid thermal evaporation to create "crisp pockets" within the protein fibers.
When the avocado oil hits the surface, it initiates the Maillard reaction between the soy amino acids and the maple sugars, hardening the exterior while the interior remains slightly chewy.
Method Comparison for Maximum Crunch
| Method | Time | Texture | Best For |
|---|---|---|---|
| Cast Iron Skillet | 10 minutes | Maximum char and uneven, rustic crispness | Quick breakfasts |
| Oven Roasting | 20 minutes | Uniformly dried and consistently crunchy | Large batch meal prep |
| Air Fryer | 8 minutes | Extremely brittle and "shattered" edges | Salad toppers/bits |
Choosing your method depends on how much "chew" you want. I personally love the stovetop because I can control the exact moment the edges start to lace up and caramelize. If you're looking for something to pair with a hearty bowl, like my Purple Black Bean recipe, the stovetop method provides that perfect smoky contrast to the creamy soup.
Deep Dive into Component Analysis
Understanding why we use specific ingredients helps you become a more intuitive cook. We aren't just adding liquid for moisture; we are building a structural brine that changes the chemistry of the soy bean fiber.
| Ingredient | Science Role | Pro Secret |
|---|---|---|
| Soy Curls | Structural Protein | Squeeze them until they're nearly dry to make room for the marinade. |
| Maple Syrup | Caramelization Agent | The sugar lowers the smoke point slightly, helping the edges "lace" and crisp. |
| Liquid Smoke | Phenolic Flavor | A little goes a long way; it mimics the long range hickory wood firing process. |
| Tamari | Umami & Salt | The fermented soy provides deep savory notes that salt alone cannot achieve. |
The key here is the 4 oz of dry soy curls. They might look small in the bag, but they expand significantly. Don't be tempted to skip the "squeeze" step; if the curls are full of plain water, there is no room for the smoky brine to penetrate the core of the fiber.
Selecting Your Pantry Essentials
To get the best results, you want to use the exact quantities listed below. I've found that substituting for lower quality ingredients often leads to a "muddied" flavor profile.
- 4 oz Dry Soy Curls: Why this? They are whole bean, non GMO, and have a fibrous texture unlike tofu. (Substitute: Sliced king oyster mushrooms, though they are much softer).
- 2 cups warm water: Why this? Warm water penetrates the dense soy fibers faster than cold water. (Substitute: Vegetable broth for extra depth).
- 3 tbsp Tamari or Soy Sauce: Why this? This provides the necessary sodium and deep color. (Substitute: Liquid aminos).
- 1 tbsp Maple syrup: Why this? It balances the salt and aids in the "browning" reaction. (Substitute: Agave nectar).
- 1 tsp Liquid smoke: Why this? Gives that essential "bacon" aroma without a smoker. (Substitute: Smoked salt, but reduce tamari).
- 1 tsp Smoked paprika: Why this? Adds a subtle heat and a vibrant reddish brown hue. (Substitute: Chipotle powder for extra spice).
- 1/2 tsp Garlic powder: Why this? Granulated form distributes more evenly than fresh cloves. (Substitute: Onion powder).
- 1/2 tsp Onion powder: Why this? Adds a foundational savory sweetness. (Substitute: Shallot powder).
- 1/4 tsp coarsely ground black pepper: Why this? The coarse grind provides little "pops" of heat. (Substitute: White pepper).
- 2 tbsp Avocado oil: Why this? High smoke point ensures you can sear without the oil breaking down. (Substitute: Grapeseed oil).
Right then, let's talk about the oil. Honestly, don't even bother with low-fat sprays here. You need the 2 tablespoons of avocado oil to properly fry the exterior of the curls. Without it, they'll just steam and turn into a soggy mess. Trust me on this the fat is what carries the flavor to your taste buds.
Necessary Tools for Success
You don't need a professional kitchen, but a few specific items will make your life much easier. I always reach for my heavy cast iron skillet because it holds heat like a champion.
- Large Mixing Bowl: For the initial 10 minute soak.
- Fine Mesh Sieve or Clean Kitchen Towel: This is vital for the "Squeeze and Dry" technique.
- Heavy Skillet (Cast Iron preferred): To get that velvety yet-crispy finish.
- Tongs: To flip the individual curls so they brown on all sides.
- Small Whisk: To ensure the spices are fully emulsified in the marinade.
Chef's Tip: Freeze your soy curls for 10 minutes after hydrating and squeezing them. This slight chill firms up the proteins, making them less likely to break apart when you're tossing them in the pan.
step-by-step Preparation and Execution
Follow this flow to ensure your vegan soy curl bacon turns out perfectly every single time. The timing is crucial to prevent the maple syrup from burning while ensuring the soy is fully cooked.
1. Hydrate and Extract
Place the 4 oz dry soy curls in a bowl and cover with 2 cups warm water. Let them sit for 10 minutes until they are soft and pliable. Note: If you leave them too long, they can become overly mushy.
2. The Great Squeeze
Drain the curls in a sieve, then take handfuls and squeeze firmly. You want to remove as much water as possible. Note: Imagine you're trying to wring out a wet sponge completely.
3. Create the Umami Brine
In a separate bowl, whisk together the 3 tbsp Tamari, 1 tbsp Maple syrup, 1 tsp Liquid smoke, and all the dry spices (paprika, garlic, onion, pepper). Note: Whisk until the spices are no longer clumped.
4. Infuse the Curls
Toss the squeezed curls into the marinade. Use your hands to massage the liquid into the fibers. Note: Let them marinate for at least 5 minutes if you have the time.
5. Heat the Fat
Add the 2 tbsp avocado oil to your skillet over medium high heat. Wait until the oil is shimmering and slightly wispy. Note: If the oil isn't hot, the soy will absorb it and become greasy.
6. The over High heat Sear
Add the curls in a single layer. Do not overcrowd. Note: Work in batches if your pan is small to avoid steaming the "bacon".
7. Flip and Caramelize
Cook for 4-5 minutes without moving them much, then flip. Cook for another 3-4 minutes until the edges are charred and crispy. Note: You'll hear the sizzle change to a higher pitch as the moisture leaves.
8. Final Crisp
Remove from heat and let them rest on a wire rack for 2 minutes. Note: Resting on paper towels can actually make them soggy; a rack allows air to circulate.
Avoiding Common Kitchen Disasters
Even the best of us have a "mistake I once made" story. With soy curls, the most common issue is the transition from "perfectly browned" to "bitterly burnt" because of the maple syrup.
Troubleshooting the Crunch
| Problem | Root Cause | Solution |
|---|---|---|
| Soggy Strips | Too much residual water | Squeeze curls in a clean kitchen towel before marinating. |
| Burnt/Bitter Taste | Heat was too high for the syrup | Lower heat to medium and move the curls more frequently. |
| Bland Interior | Not enough marinating time | Let the curls sit in the brine for 20 minutes instead of 5. |
Common Mistakes Checklist
- ✓ Never skip the squeeze; water is the enemy of a good sear.
- ✓ Preheat the pan for 3 full minutes before adding the oil.
- ✓ Use a wide enough pan; overcrowding leads to "steaming" rather than "frying".
- ✓ Don't use cold water for the soak it won't hydrate the core effectively.
- ✓ If the pan looks dry, add a tiny bit more oil; the soy protein is thirsty!
Creative Flavor Variations to Try
Once you've mastered the base recipe, you can start playing with the profile. I've experimented with everything from spicy to sweet, and there are so many ways to customize this.
For a Spicy Black Pepper Kick
Increase the black pepper to 1 tsp and add a pinch of cayenne or red pepper flakes to the marinade. This creates a "cracked pepper" style bacon that is amazing in a breakfast burrito.
For a Quick Vegan Soy Curl Bacon Bit
Instead of keeping the curls whole, pulse the dry curls in a food processor for 2 seconds before hydrating. Follow the rest of the recipe as usual. You’ll end up with tiny, crunchy bits that are better than any store-bought salad topper.
For Oil Free Cooking
If you're avoiding oil, you can bake these at 200°C for 15-20 minutes on parchment paper. Note: They will be drier and less "velvety" than the pan-fried version, but still very tasty.
For a sweet finish to a brunch that features these savory strips, I sometimes serve a light dessert like my Sampaguita Ice Cream recipe. The floral notes of the ice cream are a brilliant palate cleanser after the heavy smoke and salt of the bacon.
Keeping Your Bacon Fresh
If you're like me, you'll want to make a big batch on Sunday to use throughout the week. The good news is that these hold up surprisingly well if stored correctly.
- Storage
- Keep cooked curls in an airtight container in the fridge for up to 5 days.
- Freezing
- You can freeze the marinated but uncooked curls for up to 3 months. When you're ready to eat, just thaw them overnight and fry as usual.
- Reheating
- Avoid the microwave! It will turn your beautiful crispy bacon into a rubbery mess. Instead, throw them back into a dry skillet for 2-3 minutes or into an air fryer at 180°C for 4 minutes to restore that "shatter" factor.
Zero Waste Tip: Don't throw away the leftover marinade in the bowl! Use it as a base for a stir fry sauce or toss some roasted chickpeas in it for a smoky snack. Also, the small "dust" at the bottom of the soy curl bag is gold save it to thicken gravies or add protein to a savory oatmeal.
Serving and Pairing Suggestions
How you serve these is just as important as how you cook them. While they are great on their own, they really shine when integrated into complex dishes.
The Ultimate Vegan BLT
Slather some vegan mayo on toasted sourdough, add thick slices of heirloom tomato, crisp romaine lettuce, and a generous pile of these soy curls. The contrast between the cold tomato and the warm, smoky bacon is absolute perfection.
Breakfast Tofu Scramble Pairing
Crumble the curls over a turmeric spiced tofu scramble. The soft texture of the "eggs" makes the crunch of the soy curls stand out even more.
Decision Shortcut
- If you want maximum crunch: Air fry the curls for 8 minutes at 190°C.
- If you want a meaty chew: Pan fry on medium heat for a longer duration.
- If you want to save time: Marinate the curls the night before.
Debunking Plant Based Myths
Let’s clear up a few misconceptions about cooking with soy curls. Many people think they are highly processed, but they are actually just whole soy beans that have been cooked and dried.
- Myth: You have to soak soy curls for hours. Truth: 10 minutes in warm water is all you need. Over soaking actually ruins the structural integrity.
- Myth: Plant based bacon can't be high protein. Truth: With 11.6g of protein per serving, this recipe is a protein powerhouse that keeps you full.
- Myth: You need a lot of salt for flavor. Truth: The umami from the Tamari and the depth from the liquid smoke provide "salty" satisfaction with much more complexity than plain table salt.
Right then, you've got the science, the steps, and the secrets. It's time to get that skillet hot. Happy cooking, and I can't wait for you to experience that first smoky, crispy bite!

Recipe FAQs
What is the fastest method to achieve maximum crispness?
Air frying provides the most brittle texture in the shortest time. Cook for 8 minutes at 190°C; the circulating hot air rapidly desiccates the exterior fibers, resulting in a shattered crispness.
How long do I need to soak the dry soy curls before flavoring?
Soak for 10 minutes in warm water. This is sufficient time for the dense fibers to fully hydrate without becoming overly spongy.
Is it true that I must use a cast iron skillet for the best sear?
No, this is not strictly necessary, but highly recommended. Cast iron retains superior, even heat, which is vital for caramelizing the maple syrup quickly without burning the soy protein.
How should I store the cooked vegan bacon for meal prep?
Store in an airtight container in the refrigerator for up to 5 days. Avoid using paper towels for storage, as they can trap moisture and soften the crisp texture.
What is the essential step to prevent the soy curls from tasting bland?
Squeeze out all the plain water before marinating. If the curls are saturated with water, the intense umami brine cannot penetrate the core protein structure.
How do I reheat the vegan bacon to restore its original crispness?
Reheat in a dry skillet or air fryer, never the microwave. A dry skillet over medium heat for 2-3 minutes, or an air fryer at 180°C for 4 minutes, will re-crisp the edges beautifully.
Can I freeze these before cooking them?
Yes, freezing the marinated, uncooked curls works well. Freeze them flat on a tray before transferring to a bag; this prevents them from sticking together for up to three months.
Vegan Soy Curl Bacon Recipe
Ingredients:
Instructions:
Nutrition Facts:
| Calories | 175 calories |
|---|---|
| Protein | 11.6 g |
| Fat | 12.1 g |
| Carbs | 10.4 g |
| Fiber | 3.1 g |
| Sugar | 3.8 g |
| Sodium | 785 mg |
