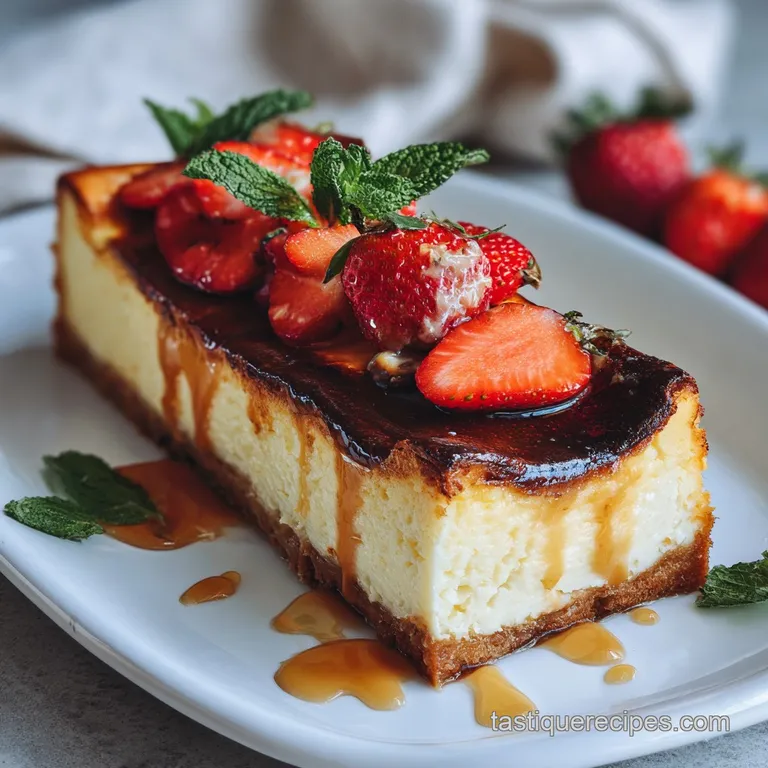
Loaf Pan Basque Cheesecake: Custardy Center
- Time: Active 15 minutes, Passive 30 minutes, Total 45 minutes
- Flavor/Texture Hook: Velvety custard with a bittersweet charred crust
- Perfect for: Small gatherings or late night whimsical treats
- Mastering Loaf Pan Basque Cheesecake
- Essential Recipe Specifics
- Handpicked Ingredient Selections
- Essential Tools For Success
- Creating The Creamy Batter
- Better Than Expensive Cafes
- Solving Common Baking Problems
- Simple Dietary Modifications
- Storing Your Leftover Slices
- Unique Flavor Pairing Options
- Recipe FAQs
- 📝 Recipe Card
You know that specific moment when the smell of toasted marshmallows hits you? Not the campfire kind, but the high end, intentionally burnt sugar kind. That is what fills my kitchen every time I slide this loaf pan basque cheesecake into the oven.
I used to think you needed a massive springform pan and a dozen guests to justify making this, but honestly, who has the patience for that?
I remember the first time I tried a "mini" version. I used a random ceramic dish and it was a total disaster soggy in the middle and pale on top. I realized the secret wasn't just the batter; it was the physics of the loaf pan.
It is the ultimate hack for getting that over high heat char without overcooking the center. Now, I make this on random Tuesdays because it’s faster than ordering takeout and infinitely more satisfying.
Mastering Loaf Pan Basque Cheesecake
We’ve all been there craving a slice of that silky, "burnt" cheesecake but not wanting to deal with the leftovers of a nine inch monster. The loaf pan is the unsung hero here.
It forces the batter into a shape that catches the heat perfectly on the sides and top while keeping the heart of the cake wobbly and lush. Trust me on this, once you try the loaf method, you'll never go back to the standard round tin for a small batch.
This recipe is all about the contrast. We’re looking for a top that looks almost ruined dark, crackly, and bitter paired with a center that’s so soft it practically sighs when you cut into it. We aren't aiming for the stiff, New York style crumb here.
We want something whimsical and almost fluid. Let's get into the "how" so you can get that oven preheating.
The Physics of the Char
- Heat Gradient Concentration: The metal loaf pan acts as a thermal conductor, pushing heat quickly into the edges while the depth of the pan keeps the core at a lower temperature.
- Maillard Scorch: High temperatures (210°C) cause the sugars and proteins to bond, creating a complex, bitter sweet crust that contrasts the sweet interior.
- Steam Stabilization: The high moisture content in the heavy cream creates steam during the bake, which prevents the cake from drying out even under high heat.
| Method | Time | Texture | Best For |
|---|---|---|---|
| Oven (High Heat) | 30 minutes | Custardy & Charred | Authentic Basque texture |
| Stovetop (Water Bath) | 50 minutes | Uniform & Dense | Classic creamy NY style |
Using the oven at a high temperature is the only way to get that iconic "burnt" look. While stovetop methods work for some cheesecakes, they lack the direct radiant heat needed to scorch the surface. If you want that deep, mahogany skin, the oven is your best friend.
Essential Recipe Specifics
| Ingredient | Science Role | Pro Secret |
|---|---|---|
| Cream Cheese | Structural Base | Use full fat for better emulsification |
| Large Eggs | Protein Binder | Room temp eggs prevent batter curdling |
| Heavy Cream | Fat Content | High fat (36%+) creates the velvet mouthfeel |
Choosing the right components is half the battle. If you use low-fat cream cheese, the water content is too high, and you'll end up with a grainy mess instead of a silky slice. I once tried to swap the heavy cream for milk during a late night baking session don’t even bother.
It just doesn't have the "heft" needed to stand up to the high heat.
Chef Tip: Freeze your cream cheese for exactly 10 minutes before mixing. This sounds counter intuitive, but it helps prevent you from over whipping and introducing too much air into the batter.
Handpicked Ingredient Selections
- 450g Full fat Cream Cheese: This is the heart of the dish. Why this? Provides the essential fat for that signature melt in-the mouth texture. (Substitute: Mascarpone for a richer, sweeter profile).
- 135g Granulated Sugar: We need this for the caramelization. Why this? It browns faster than alternatives, creating the "burnt" top. (Substitute: Caster sugar for easier dissolving).
- 3 Large Eggs: The glue holding it all together. Why this? Provides structure without making the cake feel heavy. (Substitute: 150ml liquid egg substitute).
- 240ml Heavy Cream: Needs at least 36% fat. Why this? Ensures the center stays fluid and lush after cooling. (Substitute: Full fat coconut milk for a tropical twist).
- 15g All purpose Flour: Just a tiny bit. Why this? Stabilizes the proteins so the cake doesn't totally collapse. (Substitute: Cornstarch for a gluten-free option).
- 1 tsp Vanilla Bean Paste: For those beautiful little flecks. Why this? Adds a deeper, more aromatic floral note than extract. (Substitute: Pure vanilla extract).
- 3g Fine Sea Salt: To balance the richness. Why this? Sharpens the flavor of the cheese and sugar. (Substitute: Kosher salt).
Essential Tools For Success
You don't need a pantry full of gadgets, but a standard 23x13 cm loaf pan is non negotiable. I prefer a metal one because it conducts heat much faster than glass or ceramic, which is exactly what we need for that quick sear. You'll also want some parchment paper and don't worry about folding it neatly.
The "crinkled" look is part of the aesthetic.
A solid whisk or a hand mixer will make your life much easier. We aren't trying to beat air into this batter like a sponge cake; we just want it smooth. Air bubbles are actually the enemy here because they can cause the cake to rise too much and then crater aggressively.
A simple bowl and a sturdy spatula are your best allies for a dense, creamy result.
| Servings | Ingredient Adjustments | Pan Size | Cook Time |
|---|---|---|---|
| 4 people | 225g cheese, 1.5 eggs | Mini loaf pan | 22 minutes |
| 8 people | 450g cheese, 3 eggs | Standard loaf pan | 30 minutes |
| 12 people | 675g cheese, 5 eggs | Large loaf pan | 38 minutes |
Always check for the "jiggle" regardless of the pan size. The center should wobble like set jelly when you shake the pan gently. If it looks solid, you have gone too far and lost that custardy heart.
Creating The Creamy Batter

- Preheat your oven to 210°C. Note: A hot oven is critical for the "burnt" effect.
- Line your loaf pan with two sheets of parchment paper, ensuring it hangs over the edges. The paper should look messy and rustic.
- Beat 450g cream cheese and 135g sugar in a bowl. Mix until the aroma is sweet and tangy.
- Add eggs one at a time. Note: This prevents the fat from separating from the liquid.
- Pour in 240ml heavy cream, vanilla, and salt. Whisk until the batter is velvety and smooth.
- Sift in 15g flour. Gently fold until no white streaks remain.
- Pour the mixture into the prepared pan and tap it on the counter. Note: This pops any large air bubbles trapped at the bottom.
- Bake for 30 minutes until the top is dark brown and the center still jiggles.
- Remove and let cool in the pan. The toasted sugar smell will be intense.
- Chill for at least 6 hours before slicing. Wait until the center has firmly set.
Better Than Expensive Cafes
There’s a certain satisfaction in pulling this out of the oven. It looks like something you’d pay a fortune for at a boutique bakery, but it’s actually one of the most forgiving cakes you can make. The loaf pan basque cheesecake is designed to look imperfect.
If the top cracks, it's "rustic." If the edges are uneven, it's "artisanal."
The real win is the flavor profile. By making it yourself, you can control the salt and the quality of the vanilla. Most store-bought versions use cheap extracts that get lost in the cheese. When you use real vanilla bean paste, those floral notes cut right through the richness.
It’s a sophisticated treat that feels like a reward for a long day.
Solving Common Baking Problems
Why Your Surface Isn't Browning
If your cheesecake is still pale after 25 minutes, your oven might be running cool. This cake relies on intense heat to scorch the natural sugars. If it looks like a standard cheesecake, you won't get that bittersweet contrast that makes the Basque style famous.
| Problem | Root Cause | Solution |
|---|---|---|
| No Burnt Top | Oven temp too low | Increase heat to 220°C for last 5 mins |
| Grainy Center | Overbeating the eggs | Mix eggs gently until just incorporated |
| Leaking Butter | Cheese was too cold | Ensure all ingredients are room temperature |
Don't panic if the cake rises like a soufflé and then sinks. That's actually exactly what is supposed to happen! The "collapse" creates those dense, fudgy edges and a soft, yielding center. Just make sure you don't pull it out too early if the jiggle looks like liquid milk, give it five more minutes.
Common Mistakes Checklist
- ✓ Forgetting to room temp the cream cheese (leads to lumps).
- ✓ Using a glass loaf pan (doesn't conduct heat fast enough for the char).
- ✓ Peeking in the oven (drops the temperature and stalls the browning).
- ✓ Skipping the chill time (the center won't set and will be messy to cut).
- ✓ Over mixing the flour (develops gluten and makes the cake tough).
Simple Dietary Modifications
If you're looking for a keto loaf pan basque cheesecake, the transition is actually quite simple. Swap the granulated sugar for a 1:1 monk fruit sweetener or erythritol blend. Since sugar is responsible for the browning, you might find it takes an extra few minutes to get that dark color, but the flavor remains incredibly rich.
For a gluten-free version, replace the all purpose flour with cornstarch or a gluten-free 1:1 flour blend. The flour is only there to provide a tiny bit of stability, so it doesn't affect the final flavor.
I’ve even made this with almond flour it results in a slightly denser, nuttier crumb that is absolutely delicious with a cup of espresso.
Adjusting the Batch Size
When you need to scale this recipe down for a solo treat, you can halve the ingredients easily. For the eggs, beat one egg in a small bowl and use exactly half by weight. Reduce the baking time by about 20% and keep a close eye on the jiggle.
If you are doubling it for a party, work in batches rather than trying to fit two loaves in one oven, as the steam from two cakes can prevent the tops from browning properly.
| If you want... | Do this... |
|---|---|
| Extra Char | Move rack to the top third of the oven |
| Silkier Center | Use a whisk instead of a hand mixer |
| Easier Release | Leave long parchment "handles" on the sides |
Storing Your Leftover Slices
- Fridge: Store in an airtight container for up to 5 days. The texture actually improves after 24 hours as the flavors meld.
- Freezer: Wrap individual slices tightly in plastic wrap and then foil. They stay fresh for up to 2 months. Thaw in the fridge overnight.
- Zero Waste: If you have leftover scraps, smash them up and fold them into softened vanilla ice cream. It creates a "cheesecake swirl" that is honestly better than the cake itself. Or, spread a little leftover cheesecake on a toasted piece of brioche for the ultimate breakfast.
Debunking Baking Misconceptions
"You must use a springform pan." This is simply false. The loaf pan provides better heat distribution for small batches and creates a taller slice with more "burnt" surface area per bite.
"The burnt top tastes like charcoal." Actually, it shouldn't! It’s the Maillard reaction and caramelization working together. It tastes like deep caramel and toasted marshmallows, not a burnt piece of toast. The bitterness is there to cut through the sugar.
Unique Flavor Pairing Options
While this cake is a star on its own, I love playing with the flavor profile. A simple sprinkle of flaky sea salt on top right before serving can shatter through the richness.
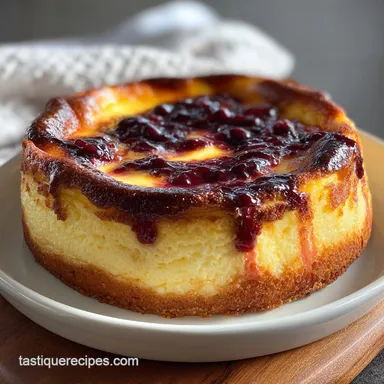
If you want to get fancy, a spoonful of tart cherry compote or a few fresh raspberries provides a necessary acidic punch to balance the heavy cream.
If you're feeling adventurous, try a jasmine tea infusion. Steep the tea in your heavy cream while it's warm, then strain and cool it before adding it to the batter. The floral, whimsical treats vibe is incredible.
Alternatively, a shot of espresso added to the batter will deepen the "burnt" notes and make it taste like a high end mocha.
Achieving the Signature Char
To get that professional looking scorched top, don't be afraid of the heat. If your oven has a convection setting, use it! The moving air helps the sugar on the surface reach that critical browning point faster.
Just be ready for the aroma it will go from "sweet cream" to "dark caramel" very quickly in the last five minutes of baking.
Cooling for the Perfect Set
The most common mistake is cutting into the cake while it is still warm. The residual heat continues to cook the center even after it leaves the oven. If you cut it too soon, the center will be runny and you'll lose that velvety texture.
Let it reach room temperature on the counter before moving it to the fridge for the long chill.

Recipe FAQs
Can I make Basque cheesecake in a loaf pan?
Yes, a loaf pan is an excellent choice for smaller batches. It maximizes the heat-to-surface ratio, which helps achieve the signature scorched top quickly.
What pan is best for Basque cheesecake?
A standard 8 or 9 inch springform pan is traditional, but a loaf pan works perfectly for smaller portions. The metal loaf pan conducts heat rapidly, which is necessary for the proper char effect.
Can I bake cheesecake in a loaf pan?
Yes, loaf pans are suitable for baking cheesecakes, especially the Basque style. They help create a taller cake with more surface area exposed to the high oven heat for that necessary dark crust.
What is the difference between a regular cheesecake and a Basque cheesecake?
Basque cheesecake is intentionally baked at a very high temperature until the top is deeply caramelized and almost burnt. Regular cheesecakes, often baked in a water bath, aim for a uniform pale top and a dense, creamy texture.
How do I get the iconic burnt top on my loaf pan Basque cheesecake?
Bake at a very high temperature, typically 210°C (410°F), for the entire duration. The high heat causes the surface sugars to scorch quickly, providing the signature bitter contrast to the sweet interior.
What consistency should the center of the cheesecake be when I take it out of the oven?
The center should still have a significant wobble, resembling set jelly. It should not look liquid, but it should definitely not be firm; the residual heat will set the custard as it cools.
Must I line the loaf pan with parchment paper?
Yes, lining the pan is essential for easy removal and to achieve the rustic, crinkled edges. Ensure the parchment hangs high over the sides so the batter doesn't stick to the exposed metal.
Loaf Pan Basque Cheesecake
Ingredients:
Instructions:
Nutrition Facts:
| Calories | 394 kcal |
|---|---|
| Protein | 7g |
| Fat | 32g |
| Carbs | 21g |
| Fiber | 0g |
| Sugar | 19g |
| Sodium | 324mg |
