Sorghum Flour Pancakes: Fluffy and Golden
- Time: Active 10 minutes, Passive 15 minutes, Total 25 minutes
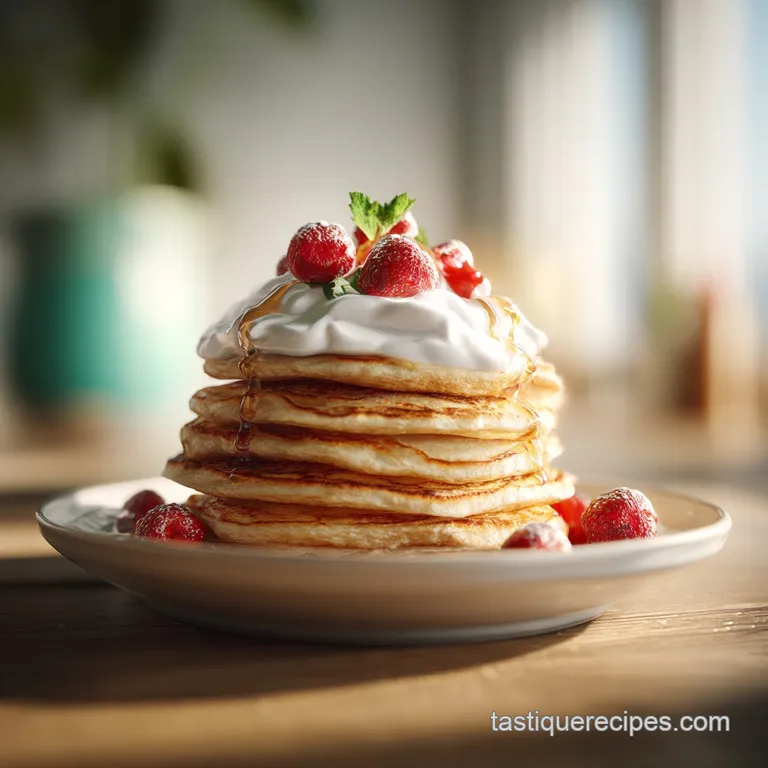
- Flavor/Texture Hook: Nutty, toasted sugar aroma with a shatter crisp edge and velvety center.
- Perfect for: Slow Saturday mornings or a nutritious, gluten-free brunch that feels indulgent.
- Crafting the Most Tender Sorghum Flour Pancakes Every Time
- Planning Your Heritage Grain Breakfast Execution
- Why This Recipe Works
- Component Analysis and Ingredient Roles
- The Essential Elements for Sorghum Flour Pancakes
- Precision Tools for the Job
- Detailed Cooking Protocol
- Master the Heat: Stovetop vs. Oven
- Troubleshooting Common Pancake Pitfalls
- Scaling for Different Needs
- Debunking Sorghum Myths
- Storage and Zero Waste Strategies
- Creative Ways to Serve and Enjoy
- Recipe FAQs
- 📝 Recipe Card
Crafting the Most Tender Sorghum Flour Pancakes Every Time
There is a specific sound that happens when a ladle of batter hits a well buttered cast iron skillet, a sharp, rhythmic sizzle that tells you the edges are already becoming golden and crisp.
I remember the first time I swapped my standard flour for sorghum; the kitchen filled with an aroma that wasn't just "sweet," but deeply toasted, almost like popcorn or parched corn. It was a rustic baking moment that changed how I viewed gluten-free breakfast entirely.
For the longest time, I thought gluten-free meant settling for something gritty or, worse, something that tasted like cardboard. But then I started playing with heritage grains. Sorghum is this incredible ancient grain that feels sturdy and honest. It doesn't try to be wheat; it brings its own personality to the plate.
This recipe is for those mornings when you want a meal that stays with you, providing sustained energy without the heavy "flour coma" that usually follows a pancake feast.
We are going for a stack that has integrity. These aren't flimsy discs. They have a beautiful, open crumb and a mahogany hue that comes from the natural pigments in the sorghum. We'll be using a few tricks, like a quick rest and a touch of acidity, to make sure they rise tall and proud.
If you've been looking for a way to bring more heritage grains into your routine, this is the most welcoming place to start.
Planning Your Heritage Grain Breakfast Execution
To get the best results, you need a flow. Don't just start mixing and hope for the best. Starchy, gluten-free batters are temperamental about temperature and timing. If your milk is ice cold, it will seize your melted butter into little waxy clumps. If you skip the rest, your pancakes will be grainy.
Follow this timeline to ensure every pancake is as good as the last.
The Hydration Window: Unlike wheat flour, which develops gluten instantly, sorghum needs a moment to absorb liquid. This 10 minute "bloom" period is when the magic happens. The starches swell, and the baking soda begins its first reaction with the apple cider vinegar.
While the batter rests, that is your time to heat your skillet slowly and evenly.
| Servings | Sorghum Flour Amount | Pan Size Recommended | Total Cook Time |
|---|---|---|---|
| 2 People | 3/4 cup (95g) | 8 inch skillet | 10 minutes |
| 4 People | 1 1/2 cups (190g) | 12 inch griddle | 15 minutes |
| 8 People | 3 cups (380g) | Large electric griddle | 25 minutes |
This table helps you visualize the scale. If you are cooking for a crowd, I highly recommend using a large electric griddle set to 350°F (180°C). This ensures you can cook four or five pancakes at once, so the first person isn't finished eating before the last plate is served.
Why This Recipe Works
- The Starch Balance: Sorghum provides the flavor and "meat," while tapioca starch adds the necessary elasticity and browning capability that gluten-free flours often lack.
- Dual Leavening: Using both baking powder and baking soda creates a two stage lift, first when mixing and second when the heat hits the pan.
- Acid Activation: Apple cider vinegar reacts with the baking soda to create immediate carbon dioxide bubbles, ensuring the batter stays light instead of dense.
- Fat Distribution: Melted butter adds a richness that coats the sorghum particles, preventing them from feeling sandy on the tongue.
Component Analysis and Ingredient Roles
Understanding what each piece of the puzzle does will help you become a more intuitive cook. We aren't just throwing things in a bowl; we are building a structural network that can hold air and heat.
| Ingredient | Science Role | Pro Secret |
|---|---|---|
| Sorghum Flour | Primary structure and protein | Use "sweet" white sorghum for a milder, more versatile flavor profile. |
| Tapioca Starch | Binding and "chew" | Don't pack the measuring cup; spoon and level to keep the pancakes from becoming gummy. |
| Apple Cider Vinegar | pH balancer and lift | It mimics the tang of buttermilk and ensures a vigorous rise when it hits the soda. |
| Coconut Sugar | Caramelization | This sugar has a lower melting point than white sugar, giving you those deep brown, lacey edges. |
The interaction between the tapioca and the sorghum is what mimics the "bite" of a traditional pancake. Without the starch, the sorghum would simply crumble. With too much, it would become rubbery. This 6:1 ratio is the sweet spot I found after many weekend experiments.
The Essential Elements for Sorghum Flour Pancakes
Gather everything before you start. Having your egg at room temperature is a small step that makes a massive difference in how the fats emulsify.
- Whole grain sorghum flour (1 1/2 cups / 190g): Why this? Provides the nutty, toasted base and essential fiber for a hearty texture. (Swap: Oat flour for a softer, sweeter flavor).
- Tapioca starch (1/4 cup / 40g): Why this? Acts as the "glue" to prevent the gluten-free flour from being too crumbly. (Swap: Arrowroot powder for similar binding).
- Coconut sugar (2 tbsp / 24g): Why this? Adds a hint of caramel and helps with the beautiful mahogany browning. (Swap: Light brown sugar for a more classic sweetness).
- Baking powder (1 1/2 tsp): Why this? Provides the secondary lift during the cooking process.
- Baking soda (1/2 tsp): Why this? Reacts with the vinegar for immediate fluffiness.
- Fine sea salt (1/2 tsp): Why this? Sharpens the other flavors and balances the sugar.
- Whole milk (1 1/4 cups / 300ml): Why this? The fat content ensures a tender crumb. (Swap: Full fat oat milk for a dairy-free version).
- 1 Large Egg: Why this? Provides protein structure and helps the pancakes hold their shape. (Swap: 1 flax egg, though the rise will be slightly less).
- Unsalted butter (2 tbsp / 28g): Why this? Melted and cooled to add richness and a silky mouthfeel. (Swap: Melted coconut oil).
- Pure vanilla extract (1 tsp): Why this? Rounds out the earthy notes of the grain.
- Apple cider vinegar (1 tsp): Why this? Essential for the chemical reaction with the baking soda.
Precision Tools for the Job
You don't need a high tech kitchen, but a few specific items will make your life easier. A heavy bottomed skillet is your best friend here. It holds heat better than thin aluminum, which means your temperature won't drop as soon as the cold batter hits the surface.
I always reach for my cast iron skillet. It creates a "crust" that non stick pans just can't replicate. If you're looking for more ways to use specialty grains in your baking, you might find that these Chip Cookies for 18 recipe offer a similarly complex flavor profile using heritage ingredients.
For flipping, use a wide, thin offset spatula. Since these pancakes are gluten-free, they are slightly more delicate until they are fully set. A thin spatula can slide underneath without tearing the bottom.
Detailed Cooking Protocol

- Aerate the dry base. Whisk the sorghum flour, tapioca starch, coconut sugar, baking powder, baking soda, and salt in a large bowl. Note: Whisking for a full 30 seconds breaks up the dense sorghum clumps and incorporates air.
- Emulsify the liquids. In a medium bowl, combine the milk, egg, melted (and cooled) butter, vanilla, and vinegar. Note: Whisk until the egg is completely integrated and the mixture looks uniform.
- Combine with care. Create a well in the dry ingredients and pour in the wet mixture.
- Stir from the center. Use a gentle hand to stir from the inside out until just combined. Note: A few small lumps are perfectly fine; over mixing can lead to a tougher texture.
- The Bloom phase. Let the batter sit undisturbed for 10 minutes. Until the batter looks slightly thickened and small bubbles appear on the surface.
- Preheat the surface. Set your skillet over medium heat. Until a drop of water dances and evaporates instantly on the surface.
- Portion the batter. Lightly grease the pan with butter and pour 1/4 cup of batter for each pancake.
- The first sear. Cook for about 2-3 minutes. Until the edges look matte and bubbles form and stay open on the surface.
- The flip. Slide your spatula underneath and flip in one swift motion.
- Final browning. Cook for another 1-2 minutes until the bottom is deep golden and the center springs back when lightly pressed.
Chef's Tip: If you find the pancakes are browning too fast before the middle is cooked, drop your heat slightly. Sorghum has natural sugars that can scorch if the pan is screaming hot.
Master the Heat: Stovetop vs. Oven
While most people stick to the stovetop, you can actually bake these for a "giant pancake" experience or to keep a large batch warm.
| Method | Temperature | Texture Outcome | Best For |
|---|---|---|---|
| Cast Iron Stovetop | Medium Heat | Crispy, buttery edges | Classic weekend breakfast |
| Electric Griddle | 350°F (180°C) | Even, consistent golden color | Large family batches |
| Oven Finish | 200°F (95°C) | Soft and steamy | Keeping stacks warm while cooking more |
Troubleshooting Common Pancake Pitfalls
Why Your Pancakes Are Gummy in the Middle
This usually happens for one of two reasons: either the heat was too high, searing the outside while the inside stayed raw, or the batter didn't "bloom" long enough. The tapioca starch needs that 10 minute rest to begin hydrating.
If it hits the heat while still "dry," it can turn into a gel like consistency rather than a crumb.
Why They Are Falling Apart
Sorghum lacks the "elastic web" of wheat. If your pancakes are crumbling when you flip them, you might be flipping too early. Wait until those surface bubbles are not just appearing, but actually popping and leaving little holes that don't fill back in.
This is the sign that the internal structure has set enough to handle the movement.
| Problem | Root Cause | Solution |
|---|---|---|
| Burnt outside, raw inside | Pan temperature is too high | Lower heat to medium low and use a heavier pan. |
| Flat and thin | Expired baking powder or skipped vinegar | Check your leavening dates; ensure vinegar is added for the acid base reaction. |
| Gritty texture | Flour hasn't hydrated | Increase the "bloom" time to 15 minutes. |
Common Mistakes Checklist
- ✓ Never use cold milk with melted butter (it creates lumps).
- ✓ Don't skip the 10 minute rest; it's the most important step for texture.
- ✓ Avoid pressing down on the pancake with your spatula (it squeezes out the air bubbles).
- ✓ Keep the pan lightly greased between batches to maintain that "shatter crisp" edge.
- ✓ Ensure your baking powder is fresh by dropping a pinch in hot water; it should fizz violently.
Scaling for Different Needs
Scaling Down (Single Serving): If you only need a few pancakes, you can easily halve this recipe. Use one small egg and just half the measurements. Since you can't really use half an egg easily, beat the egg in a small cup first, then measure out about 2 tablespoons for your half batch.
Scaling Up (Brunch Party): Doubling this recipe is a breeze, but watch your leavening. Instead of doubling the salt and spices exactly, I usually go for 1.5 times the amount to keep the flavors from becoming overwhelming. You'll want to use two skillets or a large griddle to keep the flow moving.
- Decision Shortcut
- How do you want them?
- If you want them extra fluffy
- Separate the egg white, whip it to soft peaks, and fold it in after the 10 minute rest.
- If you want them more savory
- Reduce the sugar to 1 teaspoon and add 1/4 cup of finely grated cheddar to the batter. For a different savory twist, you might enjoy the techniques used in Sourdough Scallion Pancakes.
- If you want them dessert like
- Add 1/2 cup of mini chocolate chips to the batter just before pouring onto the griddle.
Debunking Sorghum Myths
Myth 1: Sorghum is always bitter. Actually, "white" or "sweet" sorghum flour is incredibly mild. If you've had a bitter experience, the flour might have been old. Like all whole grains, sorghum has natural oils that can go rancid.
Always smell your flour; it should smell like sweet grain, not like old cardboard.
Myth 2: You can't get bubbles in gluten-free pancakes. While it's true we aren't building gluten, the chemical reaction between baking soda and apple cider vinegar creates plenty of carbon dioxide. If you don't see bubbles, your leavening agents are likely past their prime.
Storage and Zero Waste Strategies
- Fridge
- Place leftovers in an airtight container with parchment paper between layers. They stay fresh for up to 3 days.
- Freezer
- These freeze beautifully! Flash freeze them on a baking sheet for 1 hour, then transfer to a freezer bag. They'll last for 2 months.
- Reheating
- Avoid the microwave if you want to keep the crisp edges. Use a toaster or a dry skillet over medium heat to bring back that signature "shatter" texture.
Zero Waste Tips: If you find yourself with a tiny bit of leftover batter that isn't enough for a full pancake, don't toss it. Cook it as a "pancake bite" and use it as a snack.
If you have sorghum flour that is nearing its expiration, it makes an excellent thickener for rustic stews or a nutty coating for fried green tomatoes. The stems of any herbs you might use for a savory version can be tossed into a freezer bag for making vegetable stock later.
Creative Ways to Serve and Enjoy
The nutty flavor of sorghum pairs exceptionally well with stone fruits. Think roasted peaches, plum compote, or even a simple smear of apricot jam. Because these pancakes have a rustic, hearty vibe, they can handle heavier toppings like almond butter or a dollop of Greek yogurt with a drizzle of honey.
If you are feeling adventurous, try a savory approach. A fried egg on top with a dash of hot sauce turns these into a fantastic "breakfast for dinner" option. The coconut sugar in the batter provides a subtle sweetness that acts as a perfect foil for salty bacon or a sharp goat cheese crumble.
Whatever you choose, serve them hot. That contrast between the hot, velvety center and the cooling topping is what makes the breakfast experience truly special.

Recipe FAQs
Is sorghum flour good for pancakes?
Yes, it is excellent. Sorghum flour provides a mild, nutty flavor and a tender crumb that closely mimics traditional wheat based pancakes.
Can a prediabetic have these pancakes?
Yes, they can be part of a balanced diet. Sorghum is a whole grain with a lower glycemic index compared to refined flours, making it a more stable choice for managing blood sugar levels.
Is sorghum flour a good substitute for all-purpose flour?
Yes, but it requires a binder. You must pair sorghum flour with the tapioca starch listed in this recipe to ensure the pancakes hold together properly without becoming crumbly.
Is sorghum flour ok for diabetics?
Yes, it is a suitable whole grain alternative. Its high fiber content helps slow the absorption of sugar, which can lead to a more gradual rise in blood glucose after meals.
How to ensure the best texture for these pancakes?
Let the batter rest for 10 minutes. This bloom period allows the sorghum flour to fully hydrate and the leavening agents to activate, resulting in a superior rise and texture.
How to reheat leftover pancakes while keeping them crispy?
Use a dry skillet over medium heat. Avoid the microwave, which turns them soggy; heating them in a skillet recreates that signature shatter texture on the edges.
Is it true that I should overmix the batter to remove every single lump?
No, this is a common misconception. You should stir only until the ingredients are just combined, leaving a few small lumps to ensure the pancakes stay light and fluffy instead of becoming tough.
Fluffy Sorghum Flour Pancakes

Ingredients:
Instructions:
Nutrition Facts:
| Calories | 346 kcal |
|---|---|
| Protein | 8.8 g |
| Fat | 10.8 g |
| Carbs | 53.9 g |
| Fiber | 3.1 g |
| Sugar | 8.4 g |
| Sodium | 648 mg |
