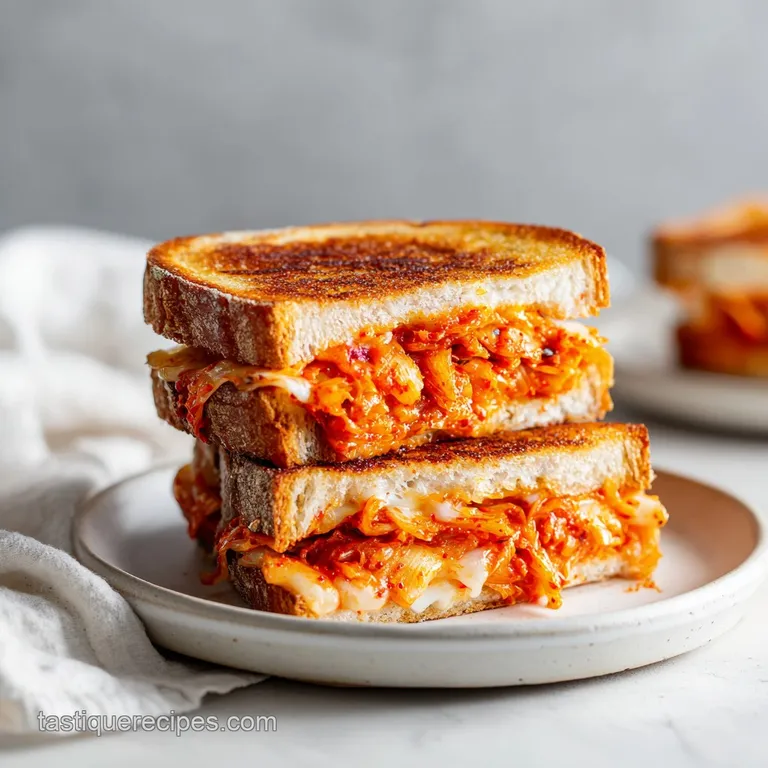
Kimchi Grilled Cheese: Ultra Crispy Fusion
- Time: Active 5 mins, Passive 10 mins, Total 15 minutes
- Flavor/Texture Hook: Tangy sweet kimchi meeting a velvety, molten cheese core
- Perfect for: A high flavor weeknight lunch or a late night comfort craving
- Mastering the Crispy Kimchi Grilled Cheese
- Essential Recipe Specifications
- Gathering Your Prime Ingredients
- Necessary Kitchen Equipment
- Simple Step-by-Step Instructions
- Fixing Common Cooking Mistakes
- Creative Recipe Variations
- Scaling and Adjustment Guidelines
- Debunking Common Kitchen Myths
- Storage and Reheating Tips
- Ideal Serving Pairings
- Critical Level of Sodium
- Recipe FAQs
- 📝 Recipe Card
Mastering the Crispy Kimchi Grilled Cheese
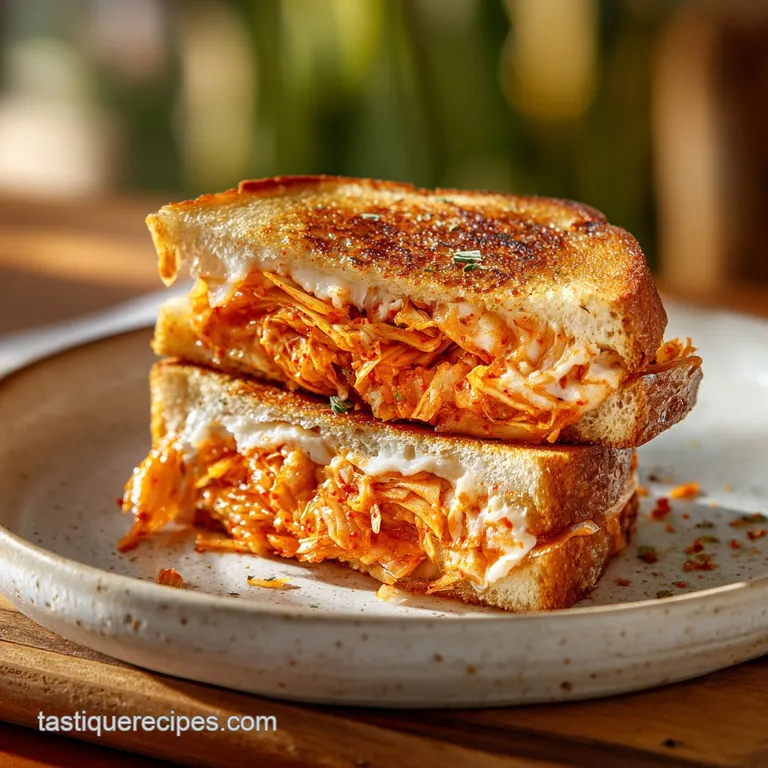
The first time I threw kimchi into a sandwich, it was a complete accident born from a bare fridge and a serious craving for something salty. I remember the specific hiss as the cold, fermented cabbage hit the hot buttered surface of the pan, sending up an aroma that was part spicy, part buttery, and entirely intoxicating.
I was worried the cabbage would make the bread soggy, but that first bite changed everything.
The bread didn't just crunch; it had this literal shatter to the crust that protected a core of gooey, orange cheddar. The acidity of the kimchi cut through the heavy fat of the cheese so well that I ended up making a second one immediately.
It's the kind of meal that feels like a discovery, bridging traditional Korean flavors with the ultimate American comfort classic. You'll never go back to plain cheese again once you've tried this balance.
This recipe isn't about just slapping things together. We are looking for that specific contrast between the bright, fermented crunch of the Napa cabbage and the rich, velvety pull of the mozzarella and cheddar blend. It's about heat control and choosing the right bread to stand up to the moisture of the kimchi.
Let's get into how we make this happen without ending up with a limp, oily mess.
Essential Recipe Specifications
Before you start heating the pan, it’s helpful to know exactly what you’re getting into with this build. This isn't a delicate tea sandwich; it's a hearty, restaurant quality meal that requires a bit of structural integrity.
- Sweet
- A touch of honey and the natural sugars in the sourdough.
- Savory
- Sharp cheddar and toasted sesame oil.
- Bright
- Lactic acid from the well fermented kimchi.
- Rich
- Full fat mayo, butter, and mozzarella.
- Lactic Acid Caramelization
- The acid in the kimchi juice reacts with the sugars in the bread, creating a deeper, more complex browning than plain bread ever could.
- Emulsified Heat Shield
- Using mayo on the exterior creates a thin, stable layer of egg and oil that browns evenly without the water content in butter causing premature softening.
- Protein Matrix
- Mixing mozzarella with cheddar provides the "pull" while the cheddar provides the sharp flavor profile we need to stand up to the spice.
| Method | Time | Texture | Best For |
|---|---|---|---|
| Cast Iron | 10 minutes | Deeply charred, unevenly beautiful | Authentic restaurant feel |
| Non Stick | 8 minutes | Uniformly golden, very consistent | Stress free weeknight lunch |
| Air Fryer | 12 minutes | Completely dry crisp, less oily | Hands off cooking |
Using a cast iron skillet is my preferred traditional technique because it holds onto heat like a beast. If you want that heavy, pressurized sear that makes the cheese weep out the sides and caramelize against the metal, cast iron is your best friend.
However, if you're multitasking, the air fryer version is a modern convenience that works surprisingly well.
Gathering Your Prime Ingredients
You need ingredients that can play their part in this flavor symphony. We aren't using "just any" bread here. You want something with a tight crumb so the cheese doesn't just fall through the holes before it has a chance to melt.
- Sourdough or Shokupan (2 slices): Sourdough adds a nice tang, but Shokupan (Japanese milk bread) offers a velvety interior that contrasts beautifully with a toasted crust.
- Unsalted Butter (1 tbsp): We use this for the interior flavor. Why this? Controls salt levels while providing that classic dairy richness.
- Full fat Mayonnaise (1 tbsp): This goes on the outside. Why this? Mayo has a higher smoke point than butter, preventing burning.
- Napa Cabbage Kimchi (1/2 cup): Use the old, "stinky" stuff. Why this? Older kimchi is more acidic and stands up better to heat.
- Sharp Cheddar (1/2 cup): Freshly grated is a must. Why this? Pre shredded cheese is coated in cellulose which prevents a smooth melt.
- Low moisture Mozzarella (1/4 cup): This is for the stretch. Why this? Provides that iconic cheese pull without adding excess water.
- Honey (1 tsp): Just a drizzle. Why this? Balances the spicy fermentation of the kimchi perfectly.
- Toasted Sesame Oil (1/2 tsp): A tiny drop goes a long way. Why this? Adds an authentic Asian nuttiness to the filling.
| Ingredient | Science Role | Pro Secret |
|---|---|---|
| Kimchi | Acidic Component | Squeeze it dry to prevent "steam softening" the bread from the inside. |
| Mayo | Fat Emulsion | Spread it edge to edge; any bare spot will won't brown as deeply. |
| Mozzarella | Structural Binder | Use low moisture blocks; fresh "wet" mozzarella will make a soggy sandwich. |
I've learned the hard way that using fresh mozzarella is a mistake. It releases too much whey when it melts, and suddenly your crispy sourdough is a wet sponge. Stick to the low moisture stuff you'd find for pizza. It’s a small detail, but it’s the difference between a sad lunch and a masterpiece.
Necessary Kitchen Equipment
You don't need a professional kitchen, but two specific tools make a massive difference. First, a heavy bottomed pan. If you use a thin, cheap pan, you’ll get hot spots that burn the bread before the cheese even thinks about melting. I love a seasoned cast iron skillet, but a heavy stainless steel pan works too.
Second, get a flat bottomed spatula or even a second smaller pan to use as a press. Pressing the sandwich down ensures maximum contact between the bread and the heat, and it helps the cheese fuse with the kimchi.
This creates a solid "brick" of flavor rather than a loose pile of ingredients that slides out when you take a bite.
Chef's Tip: Freeze your block of cheese for 10 minutes before grating. It makes the cheese firmer and prevents it from clumping together into a mushy pile while you shred it.
Simple step-by-step Instructions
- Prep the filling. Roughly chop 1/2 cup (75g) of kimchi and squeeze it over the sink until it's quite dry. Note: This prevents the juice from soaking into the bread.
- Season the kimchi. Toss the chopped kimchi with 1/2 tsp (2.5ml) toasted sesame oil and 1 tsp (5ml) honey in a small bowl.
- Prepare the bread. Spread 1 tbsp (15g) unsalted butter on the inside faces of both slices of bread.
- Layer the cheese. Place half of the cheddar and mozzarella on one buttered side.
- Add the kimchi. Spread the seasoned kimchi over the cheese layer until evenly distributed.
- Top it off. Add the remaining cheese over the kimchi and close the sandwich with the second slice of bread.
- Exterior coating. Spread 1 tbsp (15g) full fat mayo on the outside of the top slice.
- Start the sear. Place the sandwich mayo side down in a cold pan, then turn the heat to medium low. until you hear a gentle sizzle.
- Flip and finish. While the first side cooks, spread the remaining mayo on the top. Flip after 4 minutes until the crust is golden and the cheese is molten.
- Final rest. Let the sandwich sit on a cutting board for 60 seconds before slicing. Note: This allows the cheese to set so it doesn't all run out.
- Pan Temp
- 325°F (165°C) if using an electric griddle.
- Kimchi Weight
- 75g exactly after squeezing yields the perfect ratio.
- Cook Time
- Exactly 4-5 minutes per side on medium low heat.
If you are looking for a different vibe, this technique is actually very similar to how I handle the textures in my Vietnamese Pizza Rice recipe. Both rely on that specific balance of a crispy base and a soft, flavorful topping.
Fixing Common Cooking Mistakes
The most common issue I see is people being too impatient with the heat. If you crank it to high, you'll have charred bread and a cold, solid chunk of cheese in the middle. Low and slow is the mantra for any grilled cheese, especially when there's a cold filling like kimchi involved.
The "Soggy Bottom" Syndrome
This happens when there's too much moisture in the kimchi or when the heat is so low that the bread just absorbs the fat without crisping. If your sandwich feels limp, you likely skipped the squeezing step. You want that kimchi to be as dry as possible before it hits the bread.
The Cold Center
Since we are using 1/2 cup of kimchi, that's a lot of mass to heat through. If your bread is dark but the center is cold, your pan was too hot. You can fix this by putting a lid over the pan for the last 2 minutes of cooking.
This traps the steam and melts the cheese rapidly without further browning the bread.
| Problem | Root Cause | Solution |
|---|---|---|
| Bread burns too fast | Heat is too high or butter was used on the exterior | Switch to mayo for the exterior and drop the heat to medium low. |
| Cheese isn't melting | Cheese was too cold or slices were too thick | Cover the pan with a lid for 60 seconds to trap radiant heat. |
| Sandwich falls apart | Not enough cheese or too much kimchi | Ensure cheese is on BOTH sides of the kimchi to act as "glue." |
Common Mistakes Checklist:
- ✓ Squeeze the kimchi until no more juice drips out (prevents soggy bread).
- ✓ Use a "cheese sandwich" (cheese kimchi cheese) to lock the filling in place.
- ✓ Grate your own cheese from a block (better melt than pre shredded).
- ✓ Start with a cold pan or low heat to ensure the center warms through.
- ✓ Let it rest for a full minute before cutting to keep the structural integrity.
Creative Recipe Variations
Once you've mastered the basic Kimchi Grilled Cheese, you can start playing with the proteins. Adding some leftover bulgogi or even thinly sliced ham can turn this from a snack into a heavy dinner.
The Protein Boost
If you have leftover steak or even a bit of bacon, layer it right in the middle of the kimchi. The saltiness of the bacon plays off the honey we added to the kimchi beautifully. Just make sure any meat you add is already cooked, as the sandwich doesn't stay on the heat long enough to cook raw protein.
The "Green" Variation
For a bit of freshness, I sometimes add a handful of arugula or thinly sliced scallions right at the end. If you like it even more fusion style, try swapping the sourdough for a thick slice of brioche. If you’re a fan of rich, decadent desserts with an Asian twist, you might find the flavor profile of this sandwich reminds you of the creamy meets tangy notes in a Black Sesame Basque recipe.
| Feature | Fast Version | Classic Version |
|---|---|---|
| Bread | Plain White Bread | Sourdough or Shokupan |
| Prep | Kimchi straight from jar | Squeezed, chopped, honey seasoned |
| Fat | Just Butter | Mayo Butter Hybrid |
Decision Shortcut: If you want a spicier kick, add a teaspoon of Gochujang to the butter on the inside. If you want a milder flavor, rinse the kimchi slightly before squeezing it dry.
If you want extra crunch, sprinkle some Parmesan cheese onto the mayo on the outside before grilling.
Scaling and Adjustment Guidelines
If you're making this for a crowd, don't try to cram four sandwiches into one pan. You'll lose the heat and they'll end up steaming rather than frying.
- Scaling DOWN (1/2 serving): If you're just a bit hungry, use smaller slices of bread but keep the cheese ratio high. Reduce the kimchi to 1/4 cup.
- Scaling UP (2x-4x): Use a large electric griddle if you have one. If using a pan, work in batches. Keep the finished sandwiches on a wire rack in a 200°F (95°C) oven so they stay crispy while you finish the rest.
- Baking (Large batches): You can do these on a sheet pan in the oven at 400°F (200°C). Flip them halfway through. They won't be quite as "fried," but they'll be good for a group.
Debunking Common Kitchen Myths
One big myth is that you need a lot of butter for a good grilled cheese. In reality, too much butter can make the bread greasy and heavy. By using the mayo trick on the outside, you get a much thinner, more even crisp that doesn't feel like a gut bomb.
Another misconception is that all kimchi is the same. For a grilled cheese, the "fresh" kimchi (geotjeori) isn't great. It has too much structure and not enough acid. You want the stuff that's been sitting in the back of your fridge for a month.
That fermented punch is what makes this sandwich "authentic Asian" in spirit using the depth of age to create flavor.
Storage and Reheating Tips
Honestly, don't even bother with the microwave for leftovers. It will turn your beautiful sourdough into a rubbery mess. If you have half a sandwich left over, wrap it in foil and put it in the fridge. It will stay good for about 2 days.
To reheat, the air fryer is your best friend. 3-4 minutes at 350°F (180°C) will bring back that shatter crisp exterior. If you don't have an air fryer, a dry pan over medium heat with a lid will do the trick.
Just give it a few minutes on each side until the cheese starts to sizzle again.
Zero Waste Tip: Don't throw away that kimchi juice you squeezed out! Save it in a jar in the fridge. It’s "liquid gold" for seasoning fried rice, making a spicy mayo dip, or even adding a splash to a Bloody Mary for a fermented kick.
Ideal Serving Pairings
A sandwich this rich needs a bit of a counterpoint. I love serving this with a simple cucumber salad dressed in rice vinegar and sesame seeds. The cold, crisp cucumbers reset your palate between those heavy, cheesy bites.
If you're going full comfort mode, a bowl of tomato soup is the classic choice, but try adding a swirl of cream and a dash of Sriracha to the soup to keep the theme going. For something lighter, a simple miso soup or even just some pickled radishes on the side works wonders to balance out the fats.
The goal is to keep the meal from feeling one dimensional by adding a bit of fresh "snap" to the plate.

Critical Level of Sodium
1645 mg 1645 mg of sodium per serving (72% 72% of daily value)
The American Heart Association recommends limiting sodium intake to about 2,300mg per day for overall cardiovascular health.
Tips to Reduce Sodium in Your Kimchi Grilled Cheese
-
Kimchi Rinse/Fermentation Control-20%
Rinse the chopped kimchi thoroughly with water before squeezing it dry to remove excess sodium. Consider using younger, less fermented kimchi as it generally contains less sodium.
-
Low-Sodium Cheese Choices-15%
Substitute regular Cheddar and Mozzarella with their low-sodium or reduced sodium alternatives. This can significantly decrease the overall sodium content of the grilled cheese. Consider Swiss or Monterey Jack.
-
Bread Selection-10%
Opt for a naturally leavened sourdough bread, which may have a lower sodium content. Check the nutrition label to compare sodium levels between different bread brands and varieties.
-
Reduce Mayonnaise-10%
Use half the amount of mayonnaise or swap it with Greek yogurt or avocado for a lower sodium alternative.
-
Unsalted Butter
Using unsalted butter is already a great start, but ensure you don't add any additional salt during cooking.
-
Flavor Boost
Enhance the flavor with fresh herbs and spices like garlic powder, onion powder, or smoked paprika to add depth without sodium. Adjust honey and sesame oil to taste.
Recipe FAQs
Do kimchi and cheese go together?
Yes, they are an excellent pairing. The sharp, lactic acidity of the fermented kimchi perfectly cuts through the richness and fat of molten cheese.
Is kimchi good in grilled cheese?
Yes, it elevates the sandwich significantly. The moisture must be squeezed out first to prevent sogginess, but the flavor contrast between tangy spice and savory cheese is superb.
What did Gordon Ramsay put in his grilled cheese?
Gordon Ramsay famously used a combination of cheddar, Gruyère, and Comté cheese. He often coats the exterior with an emulsion of butter and mayonnaise for a perfectly even, deep golden crust.
Can kimchi be grilled?
Yes, kimchi is great when cooked directly on high heat. When added to a grilled cheese, the heat slightly mellows the harshness of the fermentation while caramelizing its residual sugars.
How to prevent the bread from getting soggy from the kimchi juice?
Roughly chop the kimchi and press it vigorously between paper towels or a clean cloth. You must squeeze out excess liquid until it feels relatively dry before layering it into the sandwich.
Should I use fresh or old kimchi for the best grilled cheese flavor?
No, use older, well fermented kimchi. Older kimchi has developed a deeper, stronger acidity which is necessary to balance the richness of the cheese blend.
How to ensure the cheese melts completely before the bread burns?
Cook the sandwich over low to medium low heat consistently. Cover the pan with a lid for the final two minutes to trap ambient heat, which effectively steams the interior cheese until it melts smoothly.
Kimchi Grilled Cheese Sandwich
Ingredients:
Instructions:
Nutrition Facts:
| Calories | 757 kcal |
|---|---|
| Protein | 27.4 g |
| Fat | 48.2 g |
| Carbs | 55.8 g |
| Fiber | 3.2 g |
| Sugar | 6.4 g |
| Sodium | 1645 mg |
